Getting Started with Prosperity Corporate
Prosperity Corporate Overview
In today’s environment, everyone is looking to save time, paper and of course money. Prosperity’s Corporate Edition not only meets but exceeds those expectations. It is a powerful Learning Management System (LMS) tool that will address all of your curriculum set up, delivery and tracking needs. Features include:
• Unlimited access to Prosperity Corporate from the Intranet and Internet
• Automated email notifications
• Students activity and exam score tracking and permanent record keeping
• Customizable reporting
• Save paper, time and money by utilizing all training, reporting, and documentation in electronic format
• Delivery of course content in a wide variety of formats
• Course development capabilities using Prosperity’s native authoring tool
Prosperity Corporate is comprised of two functional areas; the Administration and Student portals, with each portal having its own web address. For example:
http://mycompany.admin.prosperitylms.com – this is an example web address for your administration portal
http://mycompany.prosperitylms.com – this is an example web address for your student portal
Administration Portal
The Administration portal allows Administrators to manage Training Resources, set up the Curriculum, Manage Student Services and Training Resources, and run Reports. Features include:
• Training Resources
o Manage instructors and classrooms
o Manage documents, courses, exams, surveys
o Upload and/or create online courses, materials, exams and assessments (surveys)
• Curriculum
o Create programs of study
o Control access to curriculum based on job roles and departments
o Create and manage instructor led training schedules
• Manage Student Services
o Import, create student accounts
o Manage student records and transcripts
o Assign students to training
o View student requests, grant approvals
• Reporting
o Prosperity comes with a library of standard reports, which can be customized to suit your needs.
Student Portal
The Student portal allows students to view course catalogs, enroll and register for all modalities of training, view training, take exams, print certificates, communicate with instructors and other students, and more. Features include:
• Self-enrollment and registration
• View required courses for their curriculum
• View course catalog and select courses of interest that may not be required but want to include for continuing education
• View personal records stored in the system
• Print certificates upon Course or a Program completion
• Take online courses, exams and assessments (surveys)
•
•
How to use this Document
This Getting Started Guide is a high level outline introducing the sequence of tasks that comprises the set up and configuration of Prosperity Corporate for your organization. While not all tasks may be applicable to your specific needs, descriptions for all tasks involved in the set up process are included in this guide.
Links to the details and step-by-step instructions for the set up and configuration tasks are included. By using this Getting Started Guide, you will be presented with an overview of how each function of Prosperity Corporate works together.
NOTE: The terms ‘student’ and ‘learner’ are used interchangeably in this document
Sequence of Set up and Configuration Tasks
The following diagram illustrates a typical sequence for setting up Prosperity Corporate Edition.
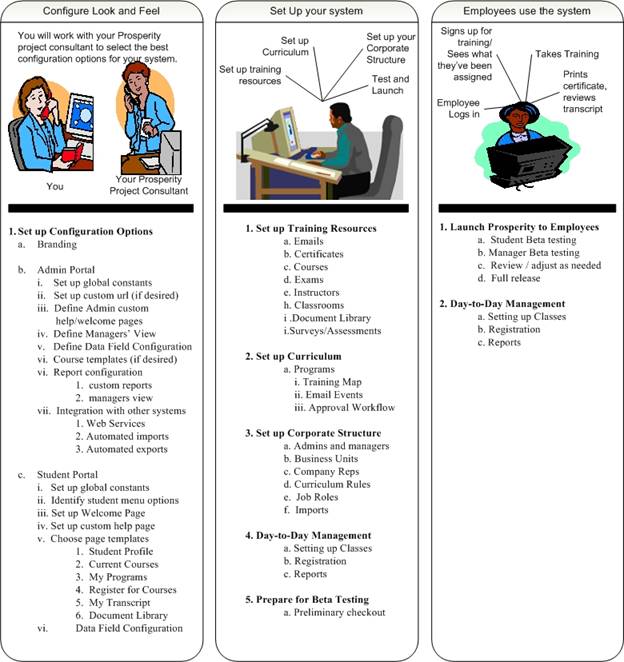
Configure Look and Feel
Set up Configuration Options
During project kickoff, clients are provided the Prosperity Portal Setup spreadsheet for completion. The responses from this survey are used to configure the Admin Portal, including what users with admin logins see and what they can access. Unless otherwise stated, the configuration options are communicated to your project consultant by completing the Setup spreadsheet. You will need to work with your Project Consultant to review and setup these configurations.
Branding
Branding refers to how the Prosperity Student Portal will look to those who log in. You will need to work with your Project Consultant to review and setup these configurations. This includes:
• Specifying the landing page once the user has logged in
• Identifying images and logos that should display throughout the student portal
• Determining the color scheme, banner and banner graphics
• Specifying the font size, color, and style
• Identifying links to additional content, such as Announcements
Clients can perform their own branding tasks by asking their project consultant for access to the ftp site, as well as information on how the site is set up for their instance of Prosperity. Clients who desire to do their own branding should have an understanding of style sheets and basic HTML. (Step-by-step instructions are available in the Configuration: Branding.)
Admin Portal
Set Up Global Constants
Below are examples of global constants defined through admin configuration. You will need to work with your Project Consultant to review and setup these configurations.
Training students can access: impacts decisions about the approval workflow for student enrolment and registration
• Curriculum: impacts decisions about the creation of training maps and job roles
• Administrative Features: impacts decisions about how many and who has access to the Admin Portal, as well as the type of access they will have
• Reports: impacts decisions about the reports that users with admin logins will be able to see.
Details are obtained by requesting the Configuration: Admin Portal training guide
Define Admin Welcome Page
Task Description: Clients provide their project consultant with a Word document, PowerPoint file, or an HTML file containing the content for the welcome page.
Result: When users with admin logins log in to the Admin Portal, a welcome page can be defined with screen text. Additionally, the welcome page can be different based on the admin group to which users are assigned. (Details are obtained by requesting the Configuration: Admin Portal training guide
Define Managers’ View
Configuration options also allow you to specify the admin portal menu options you want users within an admin group to be able to see. You will need to work with your Project Consultant to review and setup these configurations. (Details are obtained by requesting the Configuration Admin Portal training guide.)
Users with admin logins can be given three types of access permissions to Programs:
• Full read/write: can update program information, job roles, training map, events, and assessments for a specified program.
• Read only: can update program information only for a specified program.
• None: no access to programs.
Define Data Field Configuration for the Student Profile
There are several areas where you can control what data is displayed on a page. You will need to work with your Project Consultant to review and setup these configurations. Those areas are currently:
• Company profile (enterprise view)
• Company profile (manager or lower level admin view)
• Course specific custom data
• Program specific custom data
• Student profile (enterprise level view)
• Student profile (manager’s view)
• Student profile (student view)
• Class specific custom data:
If you only want certain fields in company records to be available to users with admin logins, prepare a Word document that lists these fields and provide it to you project consultant. Additionally, you can have a read only version of company records for lower level admins. Discuss this with your project consultant. (Details are obtained by requesting the Configuration Admin Portal training guide.)
Student Portal
During project kickoff, clients are provided several checklists used to configure the Student Portal, including what students who login see and the page layouts. You will need to work with your Project Consultant to review and setup these configurations.
The tasks listed below are described in step-by-step detail, and can be accessed by requesting the Configuration Options: Student Portal training guide.
You will need to work with your Project Consultant to review and setup these configurations.
Examples of these include:
• How students are entered into system: impacts how students enroll and register, as well as the fields that show on the Student Profile.
• Training students can access: impacts decisions about the courses students see in the catalog.
• How students sign up for training: impacts decisions on when students see the course catalog (before or after they enroll)
Configuration options also allow you to specify the student portal menu options you want users within an admin group to be able to see. You will need to work with your Project Consultant to review and setup these configurations.
Set Up Welcome Page
Task Description: Clients provide their project consultant with a Word document, PowerPoint file, or an HTML file containing the content for the welcome page.
Result: When users with admin logins log in to the Admin Portal, a welcome page can be defined with screen text. Additionally, the welcome page can be different based on the admin group to which users are assigned. Clients provide their project consultant with a Word document, PowerPoint file, or an HTML file containing the content for the welcome page.
Student Profile
Student profile information displays in both the Admin Portal and the Student Portal and is populated by three different methods, depending on your configuration. You will need to work with your Project Consultant to review and setup these configurations.
• Bulk Registration: Importing the Registration History file.
• Manual student enrollment and registration via the Admin Portal
• Self registration by the student via the Student Portal
Work with your project consultant by completing the Profile Checklist to define what data fields should display in the Student Profile section of the Student Portal.
Work with your project consultant to define what students see when they view My Courses, from the Student Portal.
Work with your project consultant to define what students see when they view My Programs, from the Student Portal.
Work with your project consultant to define what students see when they view My Courses, from the Student Portal.
Prosperity screens that can be configured to show LMS data in different presentations in the Admin and Student Portal are:
• Transcripts – The course history of a Student. Course Ids/Dates/Scores/etc.
• Training Maps – A list of courses that the Student is signed up for, actively reading, or eligible to register for.
Work with your project consultant to define what displays in the student transcripts and training map.
Configuring the Document Library inclues specifying columns you want students to see. You will need to work with your Project Consultant to review and setup these configurations.
Data Field Configuration
Set Up Your System
Set up Training Resources
Training resources refer to components that are used to put curriculum together, or used elsewhere. Step-by-step details for each of the tasks listed below can be accessed by requesting the Training Resources series of training guides.
Emails
Task Description: Create the content and titles for a bank of emails.
Result: Emails are associated with events that trigger email generation and notification. This is performed so that Prosperity can automatically generate emails when the Training event occurs in the system. For example, you can create a confirmation email that is automatically sent to a student when the register for a course. (Step-by-step instructions are obtained by requesting the Training Resources: Emails training guide.)
Certificates
Task Description: Provide your project consultant with a certificate template in a PowerPoint or Word document format.
Result: The project consultant coverts the template into a PDF and uploads it to Prosperity so that the client can associate certificates with specific courses and programs. (Step-by-step instructions are obtained by requesting the Training Resources: Certificates training guide .)
Courses
Task Description: A course is the smallest unit of training that learners complete and that is placed on a student transcript. Courses are bundled into programs of study.
Types of courses include online, instructor-led, or external.
Online courses can be authored outside of Prosperity Corporate or can be created by using the Prosperity Content Builder feature.
Result: When you add a course to Prosperity, it is added to a course catalog which is a master list of courses. During the Curriculum setup phase w hen Programs are created, you select courses from the course catalog that are required to complete each program. (Step-by-step instructions are obtained by requesting the Training Resources: Courses training guide.)
Exams
Task Description: Exams are created from the Course setup screen for the specified course. Prosperity Corporate can deliver three types of exams; pretests, scored pretests, and full exams.
Result:
The full exam is graded and recorded on the student’s transcript. The system uses the exam score to determine whether a student has successfully completed a course.
Students take pretests prior to opening their course. The student will be unable to open an online course if an active scored pretest exists until they take the scored pretest. The results will be saved and appear on the student transcript. (Step-by-step instructions are obtained by requesting the Training Resources: Exams training guide.)
Instructors
Task Description: An instructor is a resource used in classroom-based training. Instructor information is set up to create a bank of instructors.
Result: Instructors are associated to the course they teach and a class schedule that specifies the classroom and time(s)/date(s). (Step-by-step instructions are obtained by requesting the Training Resources: Instructors training guide.)
Classrooms
Task Description: Defining classrooms includes specifying the classroom name, description, type, and location. When setting up classrooms, you specify whether the classroom is a physical space, or online in which case you will specify the URL.
Result: Setting up classrooms is performed in order to be able to schedule classes for instructor-led training, or online webinars. (Step-by-step instructions are obtained by requesting the Training Resources: Classroom training guide.)
Document Library
Task Description: Describe and upload documents or other media such as DVDs, workbooks, audio files, etc.
Result: Creates a document library available to students that is searchable by program, audience, document and media type, etc. (Step-by-step instructions are obtained by requesting Training Resources: Document Library training guide.)
Surveys/Assessments
Task Description: Create and associate surveys/assessments to courses and programs.
Result: Surveys/Assessments are completed by students when evaluating a course or program. (Step-by-step instructions are obtained by requesting the Training Resources: Assessments training guide.)
Set Up Curriculum
Setting up curriculum involves creating Programs. A program consists of courses and activities. The Training Map is the part of a program that links the courses to the program. Students enroll in a program, and then they register for the courses that make up the program of study.
Each of the tasks listed below are described in step-by-step detail, and can be accessed by requesting the Curriculum Training Guide.
Programs
Task Description: Therefore, first, you create courses, and then you create a program. By defining the Training Map, you link the courses to a program. Students are “enrolled” in a program, and are “registered” for the courses that make up the program of study.
Result: Programs and courses populate the course catalog, into which students can enroll and register.
Email Events
Task Description: Specify system events that will trigger emails and reminders, as well as define who receives event and reminder emails.
Result: When system events occur they will trigger emails to be sent to recipients defined during this setup process.
Approval Workflow
Task Description: Define the business units (companies) whose students’ enrollments and program registrations require approval. This task includes indicating who gets a specific email when a specified event occurs in the system.
Result: Individuals who are specified to receive emails during setup, will receive the specified email triggered by an event. When a manager/supervisor selects “Enroll Approvals”, they see all pending enrollments requiring approval. When a manager/supervisor selects “Course Approval”, they see all pending course registration approvals.
Set Up Corporate Structure
Overview
Setting up the corporate structure is a way to define what a business entity is, and involves defining business units, a department, location, school, or an actual company. Prosperity supports a hierarchical business unit structure. This way you can have a top level business unit, and build a full corporate tree underneath. You can assign permissions and curriculum rules for any business unit, and can have those permissions and rules ‘trickle down’ to the business units underneath it in the hierarchy. Setting up the corporate structure in Prosperity refers to defining Program parameters for a specific company such as:
• Designating company representatives as key contacts for specific events, such as receiving automatic emails, etc.
• Indicating if students from the company require permission to enroll in a specific Program, and/or to register for a specific course.
• Specifying the administrative permission groups that can view and edit company information.
Business Units
Task Description: This task is associated with defining what a business entity is in your organization. A company can be a business unit, a department, location, school, or an actual company.
Result: When enrolling students for a specific company or business unit, the system uses the company designation to allow or disallow the enrollment. (Step-by-step instructions are obtained by requesting the Corporate Structure: Companies.)
Set Up Admins
Task Description: During the process of setting up business units within Prosperity, you identify users who you want to have access to and a login to the Prosperity Admin Portal.
Result: Specifies the administrative permission groups that can view and edit company information. (Step-by-step instructions are obtained by requesting the Corporate Structure: Companies training guide.)
Set Up Company Reps
Task Description: During business unit setup, select or create the record for the individual who is eligible to receive Event-driven Automatic Emails for students in their company.
Result: The Company Rep receives Event-driven Automatic Emails for students in their company. (Step-by-step instructions are obtained by requesting the Corporate Structure: Companies training guilde.)
Curriculum Rules
Task Description: After you add a company to the database and specify a company rep (if needed), you must define the curriculum rules, by specifying programs into which students are allowed to enroll.
Result: This process specifies how students in a company should interact with the each Program. If curriculum rules are not specified, you risk students’ inability to enroll into a program. (Step-by-step instructions are obtained by requesting the Corporate Structure: Companies training guide.)
Job Roles
Task Description: Define job roles which represent a category of work, such as supervisor, sales, accounting, programming, etc.
Result: Students are grouped into a Job Role which the system uses to determine if the student is allowed to enroll in a program
The tasks listed below are described in step-by-step detail, and can be accessed by requesting the Corporate Structure: Job Roles training guide.
Imports
The Imports feature in the Admin Portal allows the user to import data. Importing means you are taking a large amount of information from outside the Prosperity system and putting it into the Prosperity system. Data that can be imported are:
• Students
• Registrations or History
• Company
• Company Reps
• Company Rep Roles
The tasks listed below are described in step-by-step detail, and can be accessed by requesting the Set Up Corporate Structure: Imports training guide.
Students
Task Description: Create a .csv file containing specified required data, as well as selected optional field information.
Result: Information requested by the Student Profile form is populated by creating the Student Import file.
Registrations or History
Task Description: Create a .csv file containing specified required data, as well as selected optional field information.
Result: This file automatically enrolls students into a specified program and registers them into a specified course. When you have multiple students to enroll and register, use this feature.
Companies
Task Description: Create a .csv file containing specified required data, as well as selected optional field information to create company records.
Result: When the import is completed, click Company Status from the Reports menu to see the new company added to the list of companies.
Company Reps
Task Description: Create a .csv file containing specified required data, as well as selected optional field information.
Result: Company reps can be created automatically by creating the Company Rep import file.
Company Rep Roles
Task Description: Create a .csv file containing specified required data, as well as selected optional field information.
Result: In addition to importing a file containing company rep records, you can also populate the company rep record with company rep roles.
Day-to-Day Management
Day to day management covers tasks that are ongoing: the things you do as part of your daily, weekly, etc… routine.
Managing Instructor Led Training
• Task Description: Schedule classes, set class options (course, instructor, capacity, etc…), manage roster and wait list, print sign in sheets and more.
• Result: Students are able to register for the class, instructors and administrators can manage class roster, send notifications, take attendance.
• Details for scheduling and managing classes are located in the Prosperity Instructor Led Training - training guide.
Student Management (Corporate)
• Task Description: Register students, look up student records, manage student registrations waiting for approval, update student transcripts.
• Result: Registering a student adds the course or class to their transcript, and can trigger an email confirming their registration. For instructor-led classes, registering a student adds their name to the class roster. Student registrations that require course approval trigger an email to the supervisor with permissions to approve or deny a course registration.
• Details for scheduling and managing classes are located in the Prosperity Student Management Prosperity Student Management -training guide.
Reports
• The Reports Training Guide provides instructions on how to run standard reports such as Class Attendance and Student Activity reports.
Customize Reports
Prosperity’s ad hoc reports can be customized. You can create new report menus, add new reports, tailor them for your own use, and define permissions to control who has access to the reports. The Prosperity Report Editor training guide provides you with the instructions needed to set up your own reports.
Go Live
The Prosperity Launch training guide provides:
§ A Preliminary checkout check list. These are items that need to be addressed before beta testing and going live.
§ Beta testing and Full Release guidelines
 Prosperity Corporate
Overview
Prosperity Corporate
Overview