Training Guide Training Resources: Exams and Pretests
Overview
An exam is not a standalone entity but a sub component of a course.
§ A course can be set up in the catalog to only have an exam and no e-learning content.
§ A classroom-based course can have a Prosperity built exam.
§ If an exam is built into an e-learning course such as those built in Articulate or Captivate, then an exam can be the placeholder that is populated by the score results for that exam. This is also true if the exam is taken outside of the LMS.
Features of Exams
Exams built in Prosperity can take advantage of the following features:
§ Question randomization
§ Timed exams
§ Password protect exams
§ Require verification questions during exam
Prosperity can deliver three types of exams:
• Pretests: these are evaluated but the score is not recorded for the student. Typically pretests are used as a way of providing students with exercises to practice prior to taking the full exam.
• Scored Pretests: these are evaluated and the score is recorded on the student’s transcript. If a Scored Pretest is set up for an elearning course, that pretest must be taken before the student can continue onto the actual course.
• Full exams: This is a graded, recorded, and scored test that the system can use to determine whether a student has successfully completed a course.
Getting Started with Exams
This guide shows you how to:
• Define exam options
• Create objectives
• Add an exam question to objectives
• Designate the number of questions to present to the learner
To create an exam, select the Course menu option from the Curriculum menu, then choose the course. From the Course Information screen click New Revision.
Need to specify how you get to the course screen.
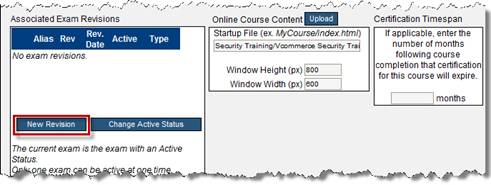
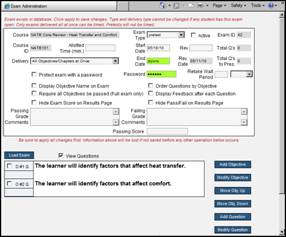
Figure 1: Create New Exam
Define Exam Parameters
1. From the Exam Type dropdown box, select from these options:
§ Full Exam
§ Pretest
§ Scored Pretest.
2. Select the checkbox next to Active to make the exam active.
3. Click Apply.
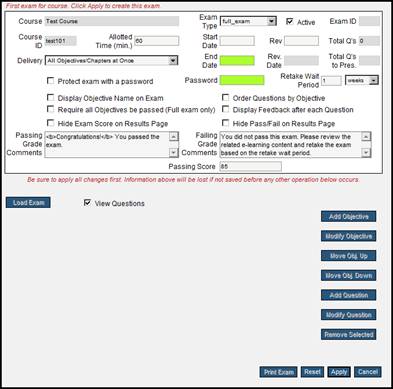
Figure 2: Define Exam Parameters
Additional Fields
§ Delivery: choose from these options:
o All Objectives/Chapters at Once: Using this option the exam is presented to the student as one whole exam.
o One Objective/Chapter at a Time: Using this option the exam is displayed to the student by objective / chapter. This is useful for exams with a lot of questions. So for example if you have an exam with 1000 questions, you may want to deliver the exam by objective, so each objective will look like a little mini-exam.
§ Start Date/ End Date: Documentation field and has no impact on the exam
§ Rev./Rev Date: Documentation field and has no impact on exam.
§ Total Q’s: this is automatically populated and incremented every time you add a question to the exam.
NOTE: Questions will not display on the exam until you set the Total Q’s to Pres.
§ Total Q’s to Pres: The value that displays here specifies how many questions will be present to the learner on the exam. The number here must be less than or equal to the value entered in the Total Q’s field. This number is also automatically populated as the sum of the number of questions to present from each objective.
§ Protect exam with a password: If checked, someone (typically a supervisor) will have to enter a password in order to launch the exam.
§ Password: If “Protect exam with a password” is checked, enter the password here.
§ Retake Wait Period: Specifies how long learner is to wait before retaking the exam, if retakes are allowed.This is set by the company (see XXXXX). Leave blank if retakes are not allowed. Enter a number, then click the dropdown to select from:
o Hours
o Days
o Weeks
o Months
o Years
§ Display Objective name on exam: If checked, and “Order questions by objective” is checked, the objective will display and questions are presented by objective.
§ Require all objectives to be passed: This can only be used with the One Objective/Chapter at a Time Delivery option. The leaner will fail the exam if they do not pass all objectives.
§ Order questions by objective: If checked, questions are presented by objective.
§ Display feedback after each question: If checked, the learner finds out if their answer is correct or incorrect before they move on to the next question. The learner cannot go back to the previous question if this is turned on.
§ Hide exam grade on results page: On the results page after the learner has submitted the exam the grade will not display; only the percent of correct answers.
§ Hide Pass/Fail on results page: On the results page after the learner has submitted the exam the pass/fail will not display.
§ Passing Grade Comments: Type the text you want the learner to be presented with if they pass the exam.
§ Failing grade comments: Type the text you want the learner to be presented with if they fail the exam.
§ Passing Score: Enter this as a number, and the system interprets it as a percentage. Default is 70%. Setting the passing score here overwrites passing score set elsewhere.
Create Learning Objectives
When a course is added to the course catalog, a generic objective is created by the system. This objective can be modified to a meaningful one during exam creation. All exam questions must be associated to a specific learning objective.
1. Click Load Exam.
2. The buttons listed to the right of the screen are now active allowing the exam to be built. By loading the exam the system pulls the course objectives previously defined and populates them here.
NOTE: Before you can add a question, you must have an objective.
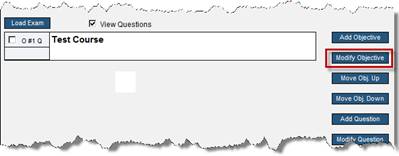
Figure 3: Load Exam
3. The generic course objective displays here. To change this to a meaningful objective, click the checkbox to the left of the objective and then click Modify Objective.
4. Enter the objective into the Add/Modify Objective screen.
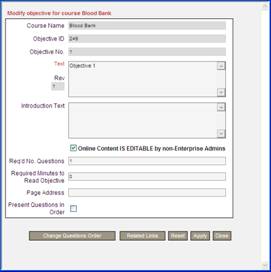
Figure 4: Modify/Add Objective
§ The course name is automatically populated
§ The Objective ID is a sequential number automatically assigned by the system for every objective in the system
§ The Objective No. is a sequential number automatically assigned by the system for the course.
§ Text: Text entered here displays on the Exam page if you are delivering the exam by objective or you have check the option on ti display the objective on the exam.
§ Introduction text: Not used.
§ The setting for Online Content is Editable by non-Enterprise Admins indicates if you are using a Prosperity Creator built course that you can allow/disallow non-Enterprise Admins to edit this objective.
§ Required minutes to read objective: This is not relevant to the exam. Its relevance has to do with putting course together. It specifies the number of minutes the learner has to read content that goes with the objective before they can open up the exam.
§ The Page Address input box is for when this objective is used in two cases: when the objective belongs to an online course whose content is delivered one objective at a time and when the objective belongs to a course built with Prosperity's online course development tool. For the latter case, you should not change the value in this field.
§ The Present Questions in Order indicates that if checked, exam questions will display by objective.
5. Click Apply.
6. Click Close.
7. To add more objectives, click Add Objectives and follow steps 4-6.
Rules Regarding Objectives
§ Objectives are not stand alone items, but are a required component of a course.
§ Exam Objectives and course Objectives are linked together.
§ If an Objective is removed from the course, the Objective and all of the associated questions for that Objective will also be removed from the exam.
Add Questions
Prior to creating an exam question a few decisions need to be made:
§ Determine the type of question you wish to create:
o Multiple Choice (includes true/false and yes/no),
o Multiple correct (select all that apply)
o Short answer
o Matching: Note that a matching test item is graded as one question.
o Essay
NOTE: Do not modify an existing exam if there have been any registrations associated with the course that holds the active exam. This includes modifying the number of questions to present for a selected Objective. Instead, create a new exam revision, make the necessary changes, deactivate the old exam, and activate the new exam. Editing historical data will cause problems regarding reporting accuracy and grading
§ Determine the text of the question.
§ If creating a multiple choice question, determine the correct answer and incorrect answers (distracters) you wish to present to students.
§ If creating a matching question, determine the words or phrases which will exist in the left-hand column and their matching counterparts that will exist in the right-hand column.
Adding a new Question
1. Select the check box to the left of a specific Objective. (all questions will need to be associated toward a specific Objective)
2. Select Add Question.
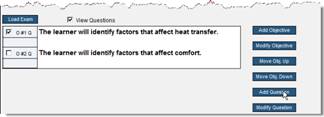
Figure 5: Add Question
3. Select New Question or search though existing questions previously entered into the system. Existing questions can be searched by:
§ Program
§ Question text
§ Objective text
§ Keyword
§ Show All
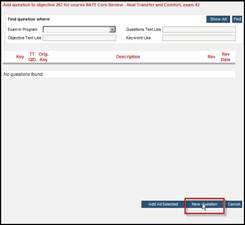
Figure 6: New Question
4. Enter the Question in the Question Text field.
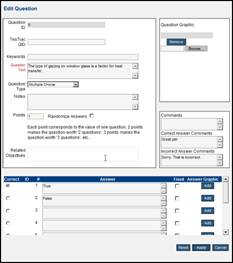
Figure 7: Question Text
5. Select the Question Type from the drop down menu.
6. Enter distracters and specify the correct response(s).
7. Click Apply
8. Repeat steps 1-8 until you have are finished adding questions for the specified objective.
NOTE: The Total Q’s (total number of questions, located at the top right of the exam window) is recorded each time a question is entered. However, the Total Q’s to Pres (total questions to present, located at the top right of the exam window) must be set in order for questions to actually exist on a student’s exam. This is set when modifying Objectives.
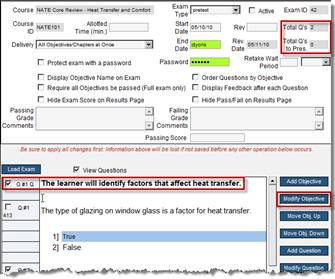
Figure 8: Modify Objective
9. Tell the system the number of questions to present for the specified objective by clicking the checkbox to the left of the objective, then clicking Modify Objective.
10. In the Modify Objective screen, enter the number of questions for the specified objective you want to present in the exam.
11. Click Apply.
12. Click Close.
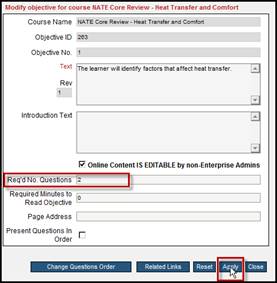
Figure 9: Number of Questions
13. This returns you to the Exam screen, where you will notice that the Total Q’s to Pres are now 2.
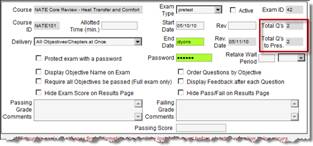
Figure 10: Questions to Present
NOTE: More questions can be within a selected Objective than the number of questions to present. This is used to ensure that individual students receive a random selection of questions each time the exam is taken.
Pretests or Exams Built into the Course Content
This is when the exam is built into the course content and Prosperity captures the exam score results. In this case, the admin will need to create an exam entry as a full exam, make it active, set a passing score, and define at least one Objective but NOT assign any questions to it. This will let Prosperity know to capture the exam score.
1. Locate the course in the system by selecting Courses from the left hand menu.
2. Search for the existing course by course name or course id and select the Search button located in the top right of the screen. (Selecting the Search button will return all active courses).
3. From the box titled Associated Exam Revisions, select New Revision to create a new exam or pretest.
4. From the Exam Type dropdown box, select the full exam type.
5. Select the checkbox next to Active.
6. Define a passing score for the exam. This is most likely also set within the SCORM developed course content files but will also need to be defined here in the system.
7. Select the Apply button in the lower right-hand corner of the screen. Once you press the Apply button, you have recorded/saved the basic elements of the exam.
Exam Revisions
Sometimes it is legitimate to modify an exam question without making a new exam revision, and other times it is not. It is not possible to programmatically understand all the reasons that are legitimate to change an exam (without a revision) and which are not. The administrator must make a decision about when to create an exam revision. This should be at least partially based on maintaining the integrity of the exam, as well as the student results.
Here are the basic rules that you should apply when determining when to make an exam revision and when you don’t have to:
|
Create a New Exam Revision |
New Exam Revision is NOT Necessary |
|
Changing the number of questions to present for a selected objective |
Add a new question to an exam |
|
Remove a question from an exam if are registrations associated with the course that holds the active exam: § Create new exam revision § Make necessary changes § Deactivate old exam § Activate new exam |
Remove a question from an exam if no registrations are associated with the course that holds the exam |
|
Modify an existing question if there are registrations associated with the course holding the active exam: § Create new exam revision § Make necessary changes § Deactivate old exam § Activate new exam |
Modify an existing question if no registrations are associated with the course that holds the exam.
Make cosmetic changes to an existing question to correct typos, add images, or change the wording. |
|
Modifying the correct answer on a question if there are registrations associated with the course that holds the active exam: § Create new exam revision § Make necessary changes § Deactivate old exam § Activate new exam |
Modify the correct answer on a question if there are no registrations associated with the course that holds the exam. |
 Prosperity ILT Training Resources:
Instructors
Prosperity ILT Training Resources:
Instructors