Training Guide Set Up Training Resources: Courses
Courses Overview
A course is the smallest unit of content that can be delivered and recorded on a student’s transcript. You will learn how to make courses available to students in the curriculum / programs guide. This guide focuses on adding courses to the course catalog, thereby creating a master list of courses.
Course Types
There are several course types:
§ Online – This includes the following:
o Courses built with Prosperity’s native authoring tool
o Courses built with another authoring tool
o Courses that have other kinds of electronic content such as links to web sites, word docs, etc…
o Courses that have no content, but only an online exam.
§ Classroom - If a course is designated as a classroom course, then the Prosperity administrators will need to create one or more class sessions that represent the specific dates and times that the particular course will be offered.
§ External – this is for training where the course is not in the Prosperity course catalog. A good example would be a course taken at a community college, or a seminar.
Course Components
A course can consist of several components. Not all components are required for the initial setup, and not all will be associated with every course.
§ Objectives: A Course can be made up of one or more ‘Objectives’. (Covered in the Exam Creation Guide)
§ Exams/Tests: A Course can also have a number of associated exams. (Covered in the Exam Creation Guide) Available exam types are:
o Scored pretest- this is an exam that students take prior to taking any training. The results are saved on the student’s transcript.
o Pretest – this is a practice test. Students can take the pretest over and over again. They can check their answers, look at the correct answer, and receive a final score. The score is not saved on their transcript.
o Full Exam / Post Test – this is an exam that is recorded on the student transcript. Passing this test will mark the course as completed.
§ Assessments/Surveys: A course can be associated with an assessment (aka survey) Think of an assessment as a survey that rates student satisfaction with the course. (Covered in the Assessment Creation Guide)
o A survey can be required so that a student must complete the survey (as well as any other course-specific requirements) in order to have the course marked as completed.
§ Certificate: A Course can be assigned a certificate of completion which the student can print once they have completed the course.
Getting Started with Courses
This guide shows you how to:
1. Enter basic course information, such as the title, description, and delivery mode (online, classroom, or external)
2. Add related supplementary materials.
3. Define tracking parameters.
4. Assign a certificate of completion
5. Add a classroom-based course
The courses functionality is accessed by clicking the Courses option of the Curriculum menu.
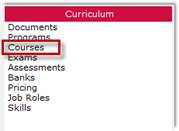
Figure 1: Courses Menu Option
Add a New Course
1. From the Courses main screen, click Add New Course.
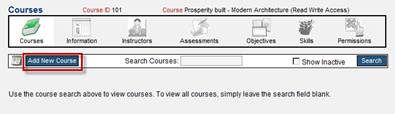
Figure 2: Add New Course
2. A blank course form displays that is divided into several sections:
o Course Information (top)
o Course Content (middle)
o Misc.(bottom)
In this screen you will define the course, create and/or associate exams, associate emails to course events. You can also upload pre-built courses or specify to build the course using Prosperity’s online course development tool.
NOTE: Field labels in red are required.
Enter Course Information
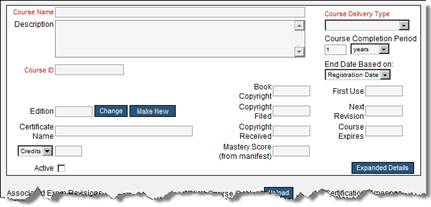
Figure 3: Course Identifying Information
3. In the Course Information section, start by entering the Course Name and Description. The name can be up to 64 characters in length (fields listed in red are required).
4. Enter the Course ID. The Course ID is the course’s shorter name, such as SCI-101.
5. Click the Course Delivery Type dropdown to select the delivery type.
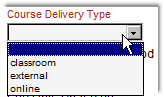
Figure 4: Course Delivery Dropdown
6. Course delivery types determine how the course will be administered to the student, and the selections are:
o Online: course will be available to take online via the student portal.
o Classroom: Instructor led scheduled training.
o External: student may receive materials in the mail and take the course at his or her own pace.
7. The Course Completion Period controls how long a student has to complete a course. This time period is based on the below field End Date Based On which by default, is Registration Date. The course completion period is only relevant to online courses, or classroom courses that also have an online exam.
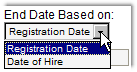
Figure 5: End Date Dropdown
NOTE: If a student does not complete a course prior to this time span, the student's registration will be closed and the student will be unable to launch and/or complete the course, or take the exam. However, there is a setting at the Program level that will disregard this setting for all courses within that selected Program.
8. Below Certificate Name is a dropdown box that allows the selection of Credits, Hours, Days, or CEU’s. *** picture below should also show the text field where you input the number of credits, hours, etc….
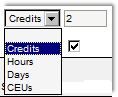
Figure 6: Course Value Options
9. Mastery Score – this is the score required in order to pass a test. You can change the passing score when you create the exam. If you upload a SCORM compliant course, Prosperity will automatically read this from the course manifest (imsmanifest.xml).
10. Select Active to make the course active in the system. As soon as the course is activated and added to an active program, it is available for registration by eligible students.
Optional Course Information Fields
§ Book Copyright, Copyright Filed, Copyright Received, First Use, Next Revision and Course Expires are informational fields that do not influence the functionality of Prosperity but allow you to track this information with the edition of the course.
§ Edition is the course’s edition number. Edition numbers can be modified by entering a new edition number and pressing the Change button. New Course Revisions can be created by entering a new edition number and pressing the Make New button.
Add an Exam
During course setup you can create an exam that students must pass in order to complete the course. This is covered in the Training Resources: Exam Setup Guide.
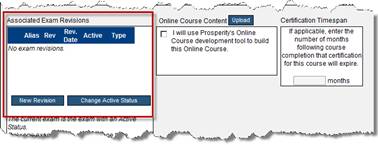
Figure 7: Add an Exam
Course Content
The middle section of the main Course screen is concerned with identifying the source and adding the course content. There are two ways to add course content:
§ Upload a course built using a third-party tool, such as Articulate or Captivate.
§ Build a course using the Prosperity Course Builder (See Training Resources: Prosperity Course Builder Training Guide)
Uploading Pre-built Courses
11. In the middle of the second row of boxes, you will see a box entitled “On-line Course Content.”
12. Click the Upload button.
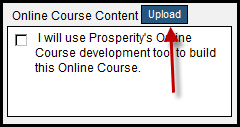
Figure 8: Upload Pre-built Course
NOTE: If you uploading pre-built course content, (whether the actual course content will reside on the same web server as Prosperity or whether it will exist on a different web server) do NOT click the checkbox.
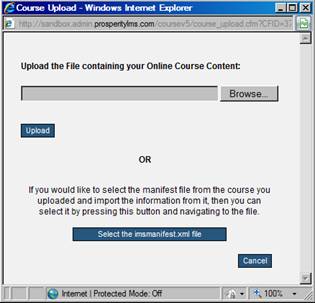
Figure 9: Browse for Course File
You have two choices for uploading the course files for a pre-built course:
§ Browse for the online course files in a zip file
§ Or, specify to upload the manifest.xml file
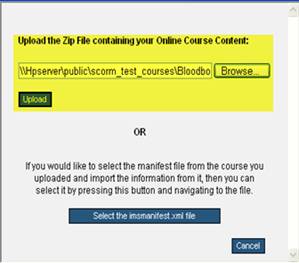
13. Click Browse and navigate to the zip file containing the course files, and double-click it to select it.
14. OR, click Select the lmsmanifest.xml file and navigate to the manifest xml file and double-click it to select it.
15. Click Upload to transfer the specified zip file to the server.
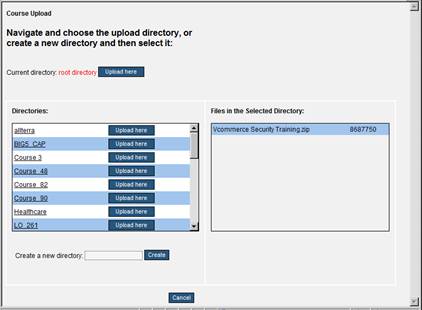
Figure 10: Course Upload Screen
16. Select the upload directory by clicking Upload here.
17. OR, create a new directory by typing the directory name in the Create a new directory field, and clicking Create. The new directory path will display, and then you click Upload here.
NOTE: Always upload course content into a directory; never upload files into the root directory.
18. After selecting Upload here, a warning message appears.
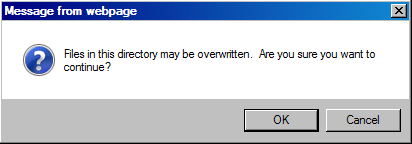
Figure 11: Upload Confirmation
19. Click OK.
NOTE: Files will only be overwritten if a file exists in the selected directory with the same name as the uploaded file.
20. A confirmation window displays with the course title, description, and the path for the launch file. If the information is correct, click Apply.
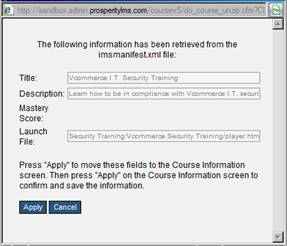
Figure 12: Course Upload Confirmation
NOTE: Always verify that the course name and description are as expected.
21. From the Courses main screen for the specified course, click Apply.
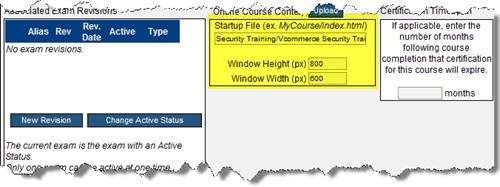
22. Notice the middle section of the Courses main screen. The middle box now displays a path for the startup file. Again, confirm that the path is correct. If it is not, change it here. Then indicate the window height/width for the course.
23. Click Apply.
Certification Timespan
The Certification Timespan allows the administrator to enter the number of months for which a student will receive certification upon completion of the course. This time frame is utilized for generating a reminder email prior to the certification end date.
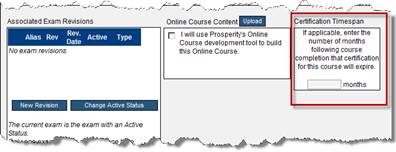
Figure 14: Certification Timespan
Add Related Materials
Along with the material that comprises the core content for a course, you can also choose to link Related Materials to a course which provides supplemental or corollary information. Viewing related material is not required for completion of a course; however, it may provide the student with additional information or assistance in completing the core material of a course. Related Materials can either be a link to another web site, a document on another site, or a file which you upload to the Prosperity server.
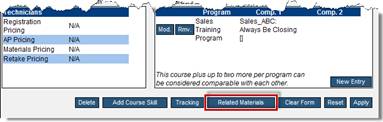
Figure 15: Related Materials
24. Click Related Materials.
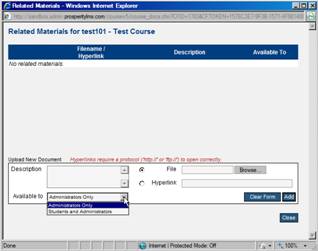
Figure 16: Related Materials
25. Click in the Description field and type a description of the materials you are adding.
26. Click the Available to dropdown and specify if the materials are accessible to the administrator only, or to both the students and administrators.
27. If you are uploading a file, click the File radio button, then click the Browse button to navigate to and select the file.
28. Click Add.
29. You can repeat step 4 and 5 for each file you are uploading.
30. If you are adding a link to a website or an intranet site, click the Hyperlink button and type in the path or URL for the site, then click Add.
31. The materials you add display at the top of the screen.
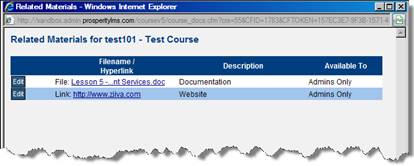
Figure 17: Added Related Materials
Tracking Parameters
The fields in the Tracking Info screen are configurable and control how the course is tracked as complete, as well as the behavior of the course. Work with your project consultant if you have requirements for custom fields.
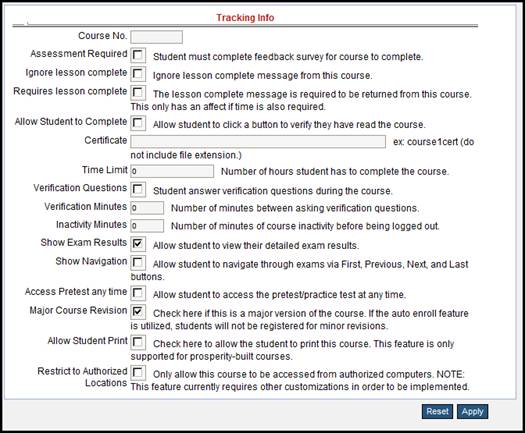
Figure 18: Tracking Parameters
Most of these fields are self-explanatory; below you will find field descriptions.
§ Course No.: Enter the course number
§ Assessment Required: Click to require a completed course feedback survey.
§ Ignore lesson complete: If checked, the LMS ignores the lesson complete message from a SCORM developed course.
§ Requires lesson complete: If checked, and a time limit is specified, the LMS requires a ‘lesson complete’ message from a SCORM developed course.
§ Allow Student to Complete: This setting is for the course offering that is not SCORM and does not contain a Prosperity built exam. It is used if a ‘read and sign’ PDF or Word document is contained in the course content. If checked, the course will launch with a button to the left that states, ‘log my training’. Clicking the button will complete the course for the student’s transcript.
§ Certificate: The certificate field is also displayed on the course information page. Certificates must be created using Adobe Writer and are typically handled by the project consultant. Type in the file name for the certificate of completion, (minus the file extension) field to associate a certificate of completion.
NOTE: It is recommended you enter the file name for the certificate on the Course screen in the Certificate Name field.
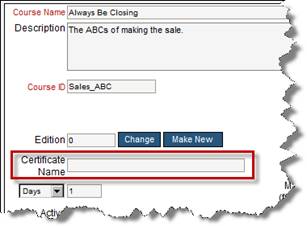
Figure 19: Certificate Name - Course Screen
§ Time Limit: Enter time limit (in hours) the learner has to complete the course.
§ Verification Questions: If checked, a verification question is presented during the exam at specified intervals. The verification question is one the student provides their answer in their profile. This confirms that the student taking the exam, is the student who is supposed to take it.
§ Verification Minutes: Specifies how often exam verification questions are presented.
§ Inactivity Minutes: Specifies the length of inactivity before the course automatically logs the learner out.
§ Show Exam Results: If checked the learner can view their exam results.
§ Show Navigation: If checked the learner can control the navigation of the exam. For example, they would be allowed to go back to a previous question. Left unchecked, they can only advance after they answer an exam question.
§ Access Pretest any time: If checked, students can access the pretest at anytime.
§ Major Course Revision: If checked, this setting designates that students who completed an earlier version of the course should consider taking this revised version.
§ Allow Student Print: If checked, the student can print the course if it was built using the Prosperity Content Builder.
§ Restrict to Authorized Locations: If checked, the course can only be accessed on authorized computers. Note that this requires additional customizations in order to implement.
§ How to set up a certificate (normally Ziiva project consultant will do this with template provided by customer. Customer can do themselves, using the guide (provide a link to the certificate setup guide)
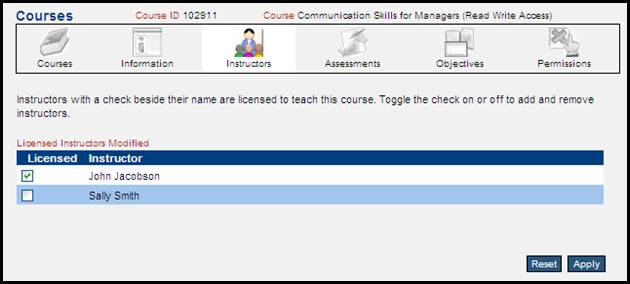
Instructors
Adding a Course License (classroom type courses only)
For instructor led training (course type = classroom), you may also want to specify which instructors can teach this course. An instructor must be licensed for a course in order to be assigned to a class for that course. This assignment can be done on the course / instructors page.
32. Click Instructors on the course menu
33. Check the checkboxes for each instructor you want to be able to teach this course.
34. Click Apply
Assessments
See the Training Resources: Assessments Guide for steps to create and add assessments.
Permissions
See the Curriculum: Programs Guide for steps to set up permissions.
 Training Guide Training Resources: Exams and
Pretests
Training Guide Training Resources: Exams and
Pretests