Getting Started with Prosperity Signature
Prosperity Signature Overview
We would like to congratulate you on your decision to purchase the solution to your eCommerce needs with the Signature edition LMS.
In today’s environment, everyone is looking to save time, paper and of course money. Signature not only meets but exceeds those expectations. You ask how? Prosperity’s Signature Edition is a powerful Learning Management System (LMS) tool with an integrated shopping cart that will address all of your curriculum set up, delivery and tracking needs.
Signature is comprised of basically two web sites, the Administration and Student portals.
|
|
The Administration
portal allows Administrators to set up the Curriculum, Manage Student
Services, and the run Reports. Features include:
|
|
|
The Student portal allows a student to view course catalogs, purchase online and instructor led training, view training, take exams, print certificates, communicate with instructors and other students, and more. Features include:
|

This document is your handbook that will describe step by step how to launch your site.
While you are working your way through the launch plan, there are abundant resources available to help you with any questions that may arise. They include: Training documentation, One on One training sessions, your Project Consultant, Technical Support and our Prosperity Foundations training webinars.
Your time is important to us so let’s not waste it. Let’s set up and implement your eCommerce site so “You” can see the benefits and ease of using the Signature edition of Prosperity and see the revenue that you will begin to receive from your site.
This Getting Started Guide is a high level outline introducing the sequence of tasks that comprises the set up and configuration of Prosperity Signature for your organization. While not all tasks may be applicable to your specific needs, descriptions for all tasks involved in the set up process are included in this guide.
Links to the details and step-by-step instructions for the set up and configuration tasks are included. By using this Getting Started Guide, you will be presented with an overview of how each function of Prosperity Signature works together.
NOTE: The terms ‘student’ and ‘learner’ are used interchangeably in this document
Launch Plan Work Flow
The following diagram illustrates the steps to prepare your site for launch. Details for each step will be described in this document.
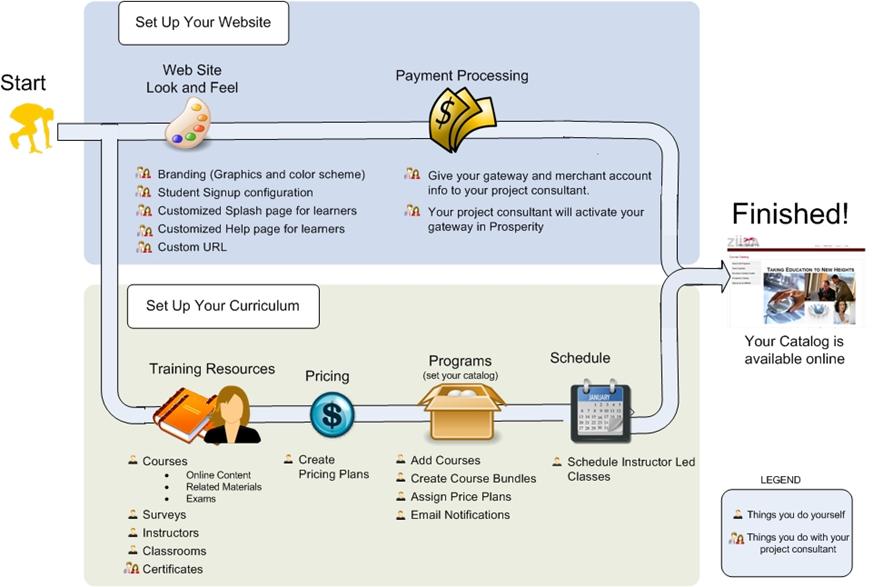
Setup Your Website
During project kickoff, clients are provided the Prosperity Portal Setup spreadsheet for completion. The responses from this survey are used to configure the Admin Portal, including what users with admin logins see and what they can access. Unless otherwise stated, the configuration options are communicated to your project consultant by completing the Setup spreadsheet.
Website Look and Feel
§ Branding (graphics and color scheme)
Branding refers to how the Prosperity Student and Admin Portals will look to those who log in. This includes:
• Specifying the landing page once the user has logged in
• Identifying images and logos that should display throughout the student portal
• Determining the color scheme, banner and banner graphics
• Specifying the font size, color, and style
• Identifying links to additional content, such as Announcements
Clients can perform their own branding tasks by asking their project consultant for access to the ftp site, as well as information on how the site is set up for their instance of Prosperity. Clients who desire to do their own branding should have an understanding of style sheets and basic HTML. (Step-by-step instructions are available in the Configuration: Branding training guide.) [Branding]
§ Student Portal Configuration
During project kickoff, clients are provided several checklists used to configure the Student Portal, including what students who login see and the different options for page layouts, as well as how to implement custom pages such as:
• Student Signup Form / Student Profile
• Customized Splash Page for learners
• Customized Help Page for learners
• Custom URL
The tasks listed above are described in step-by-step detail, and can be accessed by requesting the Configuration Options: Student Portal training guide.
Payment Processing
This section describes how to set up your Shopping Cart and Payment methods and allows you to choose:
§ What type of Payment Gateway will you use
§ What payment methods will be accepted
Payment processing is accomplished through Prosperity’s interface with a standard payment gateway. Prosperity does not store any credit card information, but passes it along over a secure (https) connection to the payment gateway. The diagram below illustrates the flow of data between Prosperity and the payment gateway.
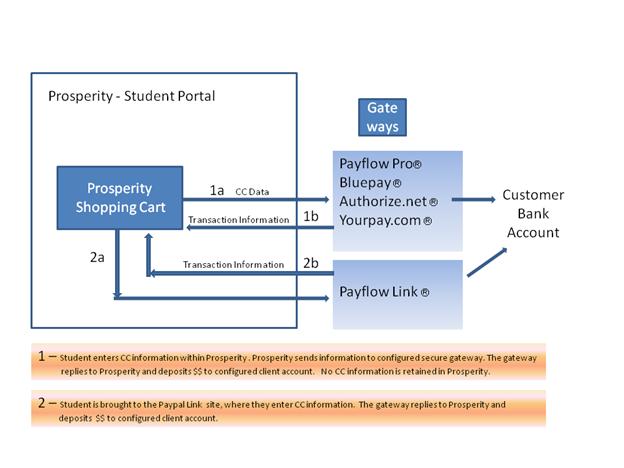
§ Prosperity works with the following gateways. You will contact your desired gateway provider and sign up for the desired gateway account and then provide the account information to your project consultant.
• PayPal’s PayFlow Pro
• PayPal’s PayFlow Link
• Blue Pay
• Authorize.net
• YourPay
The following chart shows the information you will need to provide to your project consultant, based on the gateway you select.
Required Setup information
|
Gateway |
Vendor Name |
User Name |
Password |
Merchant Id |
Tamper Proof Seal |
Version |
Transaction Key |
|
Payflow Pro |
X |
X |
X |
|
|
|
|
|
Bluepay * |
|
|
|
X |
X |
X |
|
|
Authorize.net |
|
|
|
X |
|
|
x |
|
Yourpay.com |
|
|
|
X |
|
|
|
|
Payflow Link |
X |
X |
X |
|
|
|
|
*Requires PCI certification = customer supplies
Payment Options
You can also choose which types of payment options you want to make available. Prosperity supports the following payment options.
§ Credit Card
Student supplies credit card at time of purchase and Prosperity passes the information through to your gateway. If approved by the gateway (meaning funds have transferred) we will register the student for the selected courses.
§ Check (manual processing only)
Course is put into ‘wait for payment’ state. Student cannot open course. Once check is received, admin can go to Student Services / Course Approvals and approve the registration. Courses will then be available to the student.
§ PO
Course is put into ‘wait for payment’ state. Student cannot open course. Once PO is received or otherwise validated, admin can go to Student Services / Course Approvals and approve the registration. Courses will then be available to the student.
§ Invoice
Course is put into ‘wait for payment’ state. Student cannot open course. Admin must check for invoice type payments and send the invoice to the student. Once the payment is received or otherwise validated, admin can go to Student Services / Course Approvals and approve the registration. Courses will then be available to the student.
Advanced Payment Options
§ Billing Codes / Coupon codes
A billing code works like a coupon code and has the following features:
A billing code is associated with a particular company. If you don’t have a need to track your customers by company, then you will create billing codes under the company named ‘Individual’. This company comes as a default with your Prosperity system.
A billing code is also associated with a specific program AND a particular course, multiple courses, or a packaged bundle of courses.
A billing code can be assigned a number of times it can be used. You can also specify if you want to deactivate the billing code when it is used up.
. NOTE: If you do NOT deactivate the billing code once the quantity is reached, the billing code will continue to work
You can also auto-generate a number of billing codes, for cases where you know you need 100 codes, and don’t want to type them in manually.
o You can also specify either the PRICE PLAN or a DISCOUNT off of the retail price.
§ If you select a price, that will set the price to be used for the selected item.
You may also use a discount INSTEAD of a price plan. Use a number >0 and <=1 to define a percentage discount (where 1=100% discount) OR enter a number >0 to define a dollar amount discount (ex: 10.00 = $10 discount)
NOTE: Billing codes can not be used WITH corporate discounts. If a student uses a billing code, and their company also offers a corporate discount, only the billing code will be used.
o You may use the same alphanumeric code for different courses within the same program A program, or program of study, is a grouping of courses and/or activities. a program. That way, if a student registers for more than one course, they will be able to enter only one billing code as they check out.
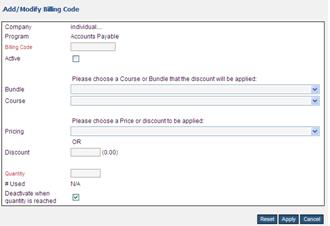
o From the Add/Modify Billing Code screen, you may also view a report of students who have registered under that billing code. Click the Student List button to view this report.
|
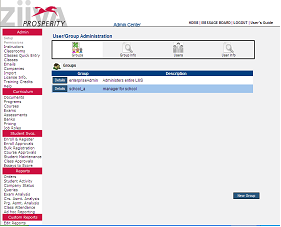
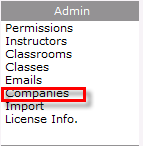
To access Billing Codes, select the Admin/Companies/ option from the admin menu..
|
|
|
This will bring up the company profile screen. Type in the name of the company (use “Individual” if you are not using a corporate hierarchy) and click the ‘find‘ button.
| |
|
Once you’ve brought up the company profile, click on the ‘Curriculum Rules’ menu item. This will bring up the company rules page. At the bottom of the company rules page, click on ‘Billing Codes’. From here you will be able to select whether you want to create a single billing code, or multiple billing codes.
| |
|
Single Billing Code § § Select the associated course OR course bundle. § Select the price plan you want to associate with this coupon. That will set the price to be used for the selected item. § You may also use a discount INSTEAD of a price plan. Use a number >0 and <=1 to define a percentage discount (where 1=100% discount) OR enter a number >0 to define a dollar amount discount (ex: 10.00 = $10 discount) § Quantity defines how many times this coupon may be used. § Deactivate when quantity is reached: This is very important! Check this to make sure the billing code cannot be used once the defined quantity is reached. If NOT checked, it can still be used.
| |
|
Multiple Billing Codes Use this option to create multiple billing codes.
§ Enter in the number of codes to generate (it will increase the sequence number by 1 for each code) § Enter in the code prefix. For example, if this code was for a June Special, you might want to use JUN as the prefix. § § Select the price plan you want to associate with this coupon. That will set the price to be used for the selected item. § You may also use a discount INSTEAD of a price plan. Use a number >0 and <=1 to define a percentage discount (where 1=100% discount) OR enter a number >0 to define a dollar amount discount (ex: 10.00 = $10 discount) § Deactivate when quantity is reached: This is very important! Check this to make sure the billing code cannot be used once the defined quantity is reached. If NOT checked, it can still be used.
| |
 Fill out the
billing code information. The billing code name is alpha-numeric (up to 32
characters).
Fill out the
billing code information. The billing code name is alpha-numeric (up to 32
characters). Enter in the number
of times each code can be used. Each code generated will be able to be
used this many times for each associated course or bundle. For example, if
you enter in ‘2’, then that code can be used twice for each course
associated with that billing code.
Enter in the number
of times each code can be used. Each code generated will be able to be
used this many times for each associated course or bundle. For example, if
you enter in ‘2’, then that code can be used twice for each course
associated with that billing code.
Setup Your Curriculum
Training Resources
Training resources refer to components that are used to put curriculum together, or used elsewhere. Step-by-step details for each of the tasks listed below can be accessed by requesting the Training Resources series of training guides.
Emails
Task Description: Create the content and titles for a bank of emails.
Result: Emails are associated with events that trigger email generation and notification. This is performed so that Prosperity can automatically generate emails when the Training event occurs in the system. For example, you can create a confirmation email that is automatically sent to a student when the register for a course. (Step-by-step instructions are obtained by requesting theTraining Resources: Emails training guide.)
Certificates
Task Description: Provide your project consultant with a certificate template in a PowerPoint or Word document format.
Result: The project consultant coverts the template into a PDF and uploads it to Prosperity so that the client can associate certificates with specific courses and programs. Students will then be able to print their certificates upon successful completion of the associated course or program. (Step-by-step instructions are obtained by requesting the Training Resources: Certificates.)
Courses
Task Description: A course is the smallest unit of training that learners complete and that is placed on a student transcript. Courses are bundled into programs of study.
Types of courses include online, instructor-led, or external.
Online courses can be authored outside of Prosperity Corporate or can be created by using the Prosperity Content Builder feature.
Result: When you add a course to Prosperity, it is added to a course catalog which is a master list of courses. During the Curriculum setup phase w hen Programs are created, you select courses from the course catalog that are required to complete each program. (Step-by-step instructions are obtained by requesting the Training Resources: Courses training guide.)
Exams
Task Description: Exams are created from the Course setup screen for the specified course. Prosperity Corporate can deliver three types of exams; pretests, scored pretests, and full exams.
Result:
The full exam is graded and recorded on the student’s transcript. The system uses the exam score to determine whether a student has successfully completed a course.
Students take pretests prior to opening their course. The student will be unable to open an online course if an active scored pretest exists until they take the scored pretest. The results will be saved and appear on the student transcript. (Step-by-step instructions are obtained by requesting the Training Resources: Exams training guide.)
Instructors
Task Description: An instructor is a resource used in classroom-based training. Instructor information is set up to create a bank of instructors.
Result: Instructors are associated to the course they teach and a class schedule that specifies the classroom and time(s)/date(s). (Step-by-step instructions are obtained by requesting the Training Resources: Instructors training guide.)
Classrooms
Task Description: Defining classrooms includes specifying the classroom name, description, type, and location. When setting up classrooms, you specify whether the classroom is a physical space, or online in which case you will specify the URL.
Result: Setting up classrooms is performed in order to be able to schedule classes for instructor-led training, or online webinars. (Step-by-step instructions are obtained by requesting the Training Resources: Classroom training guide.)
Document Library
Task Description: Describe and upload documents or other media such as video, electronic workbooks, audio files, etc.
Result: Creates a document library available to students that is searchable by program, audience, document and media type, etc. (Step-by-step instructions are obtained by requesting the Training Resources: Document Library training guide.)
Surveys/Assessments
Task Description: Create and associate surveys/assessments to courses and programs.
Result: Surveys/Assessments are completed by students when evaluating a course or program. (Step-by-step instructions are obtained by requesting the Training Resources: Assessments training guide.)
Pricing
Prosperity uses Price Plans to set a bank of prices that can reused for various courses and/or bundles.
To add or modify a price plan, follow the steps below.
|
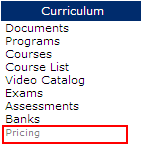
Access the Pricing module by going to the Curriculum\Pricing menu option. |
|
|
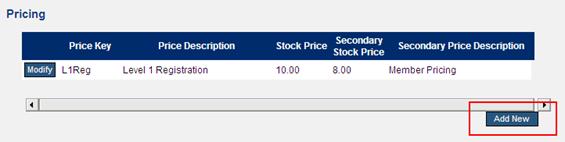
Click the “Add New” button to add a price plan. |
|
|
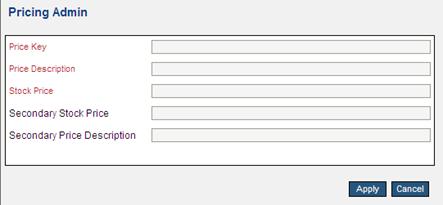
Enter in a Price Key (up to 10 characters), Price Description (up to 50 characters) and a Stock Price. Click the Apply button to save. |
|
|
|
|
Programs
Your student portal will display a catalog of available programs. Each program may have multiple courses and/or bundles of courses which the student may purchase.
Each of the tasks listed below are described in step-by-step detail, and can be accessed by requesting the Curriculum Training Guide.
Schedule Instructor Led Training
Once your training resources are set up (courses, classrooms, instructors) and your curriculum is defined (programs), you can now proceed with scheduling your instructor led training.
• Instructors and administrators will be able to schedule classes, set class options (course, instructor, capacity, etc…), manage roster and wait list, print sign in sheets and more.
• Details for scheduling and managing classes are located in the Prosperity Instructor Led Training – Training Guide.
Testing before Go-Live
These are things you can do yourself. Be sure to include a test group for beta testing. Your Project Consultant can provide additional details.
 Verify the branding and
colors on the site
Verify the branding and
colors on the site
Verify catalog displays
properly
Verify pricing, discounts,
coupon codes, checkout process
Sign up as a new student
 Verify profile data
Verify credit card
transaction
Verify welcome and help
pages
Verify student menu – is it
what you think it should be? Do all links go where you expect them to? This is
especially important with custom links.
Verify behavior of your
content by launching courses (verify completion, time tracking, bookmarking),
taking exams etc…
Take feedback survey
(optional)
Print a certificate (if
applicable)
Verify integration with
other systems (HR, membership database, social software, etc…)
Verify any other components
such as email notifications, nightly exports, etc…
Verify Admin Portal
Review the company
hierarchy (if applicable) and permissions (which admins are in which permission
groups? Which companies / business units do they have access to?
Review any customized
reports or pages.
Make sure you know how to
find a student account, look at their transcript, etc…
Review your programs and
associated courses and email notifications.
If you are allowing other
admins into the system (customers, supervisors, etc…):
o Log in as each of these admins
o Make sure they ONLY have access to the menu options, companies and students you want them to have.
o Make sure they cannot perform any functions you do not want them to have.
o Make sure they have access to the reports you want them to have, and double check to make sure they cannot report on any students, companies, etc… that you do not wish them to see.
These are items that you must do before making the site available to your clients.
Final Steps
Remove test data
Tell your Project
Consultant to switch your gateway to “live”
Very Important: Verify a transaction makes it
through to your merchant account. If not, contact your project manager.
Remember – Your Project Consultant can help you with any of the steps as needed.
 Prosperity Signature
Overview
Prosperity Signature
Overview