Prosperity ILT Training Resources: Setting Up Classrooms
Overview
The components of Instructor Led training are as follows:
§ Classroom – Where the training will be held
§ Course - What course (subject matter) will be taught
§ Instructor(s) – What instructor(s) will teach this class? (This is covered in in detail the ILT Training Resources: Instructors training guide.)
§ Class – The combination of classroom, course, instructor, roster and schedule. (This is covered in detail in the ILT Training Resources: Setting Up Classes training guide.)
In this guide, you will:
§ Add a classroom
Add a Classroom
1. From the Admin menu options, click Classrooms.
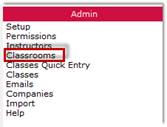
Figure 1: Classroom Menu Option
2. The Classroom Administration screen displays. Any classrooms that have been defined will display here.
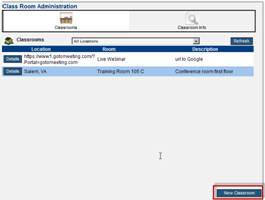
Figure 2: Add New Classroom
3. Click New Classroom to create a new classroom.
4. The new classroom form displays. Notice that the system provides two types of classrooms; physical and online.
§ Physical refers to an actual physical classroom.
§ Online refers to a web site address the learner must access in order to complete the class.
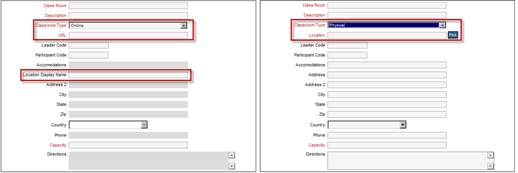
Figure 3: Online and Physical Classroom Types
5. Complete the New Classroom form. Note that any field labels in red mean they are required. Let’s examine some important fields:
o Class Room: This will display on the students class confirmation email, and is required in order to schedule the class.
o Description: Type any text that describes the room. A recommendation is to capture the attributes of the room in the description, such as: “Small classroom”, or “Large Classroom with projector”.
o Classroom Type: The options to select from are Physical or Online.
NOTE: If students have to view or participate in an online seminar or meeting, you would select Online.
o URL (Online type only): Enter the web site address required to access the online seminar, training, or meeting.
o Location (Physical type only): Clicking the Pick button displays the Companies list, from which you select the company to populate the location with the selected company’s address.
o Leader Code: If the student is accessing an online seminar or meeting, the facilitator of the event may require an access code.
o Participant Code: If the student is accessing an online seminar or meeting, they may require an access code.
o Accommodations: Use this field if for example, class participants are coming from out of town and you have lodging set up for them.
o Location Display Name (Online only): Enter the name of the web site if applicable.
o Address Information (Physical only): the physical address of the classroom.
o Capacity: The number you enter here is used by the system to close the class once the capacity is met from enrolments.
6. Click Apply when finished.
 Training Guide Training Resources: Document
Library
Training Guide Training Resources: Document
Library