Training Guide: Curriculum
Programs Overview
A program consists of a grouping of courses and activities arranged in a structure called a Training Map. Along with the Training Map, each Program has specific rules about completing courses and activities, course completion order, and minimum passing grades.
Each Program . has one Training Map divided into steps. Each individual step can require completion of a certain number of courses or course credits and/or a certain number of activities in order to complete the step. Steps can be completed by a student in any order unless the administrator elects to enforce step sequence in which case steps must be completed in order from top to bottom.
You must have at least one course linked to a program; conversely you cannot have a course available for registration unless it is part of a program of study. Therefore, first you create courses, and then you create a program. The Training Map links the courses to a program. Students enroll in a program, and then they can register for the courses that make up the program of study.
When setting up a program, you also specify who is allowed to enroll in the program based on defined job roles. Job Roles are used to define students’ access to Programs.
Other tasks involved in setting up a program are:
§ Defining a schedule
§ Specifying system events that will trigger emails and reminders
§ Specify who has administrative access to the program
Getting Started with Programs
This guide shows you how to:
1. Set up core program information
2. Specify job roles
3. Define the training map
4. Define a schedule
5. Designate email events and reminders
6. Define permissions
Setting up a Program
1. Click Programs from the Curriculum menu options.
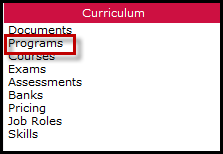
Figure 1: Programs Menu Option
2. All active programs in the system display.
3. Clicking only active displays only active programs in the system. You can type a key word into the key word search field and then click Refresh to list programs that match your search criteria.
NOTE: Programs or courses that are specified as Active mean they are available to students. Leaving Active unchecked does not delete a course or program; it removes its visibility from the student and from the default list of program or courses.
4. Click Add New Program located in the upper left-hand corner of the screen.
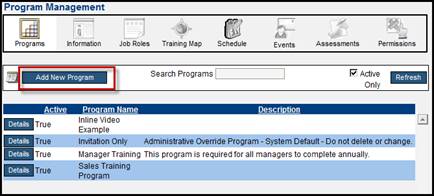
Figure 2: Add New Program
5. Click in the Name field and type the program name. This should be a short but recognizable name.
6. Enter the program Description. You can add HTML formatting or images into the Description text field.
7. Leave the Revision field blank. Only enter a value if you are making a revision to the program.
8. Click to check the Active checkbox.
NOTE: Until activated, students will be unable to view the Program.
9. Click Apply.
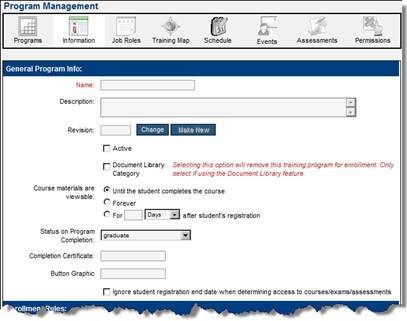
Figure 3: General Program Info
General Program Info:
§ Course Materials are viewable: This designates the period of time the student can access the course materials. Options are:
o Until the student completes the course: Once they complete the course, they can no longer access course materials (default.)
o Forever: If checked, this specifies that students can access materials without having to re-register for the course.
o Specify the exact period of time in days or months after registration by using the dropdowns.
§ Status on Program Completion: Upon enrolment, their status is set to Enrolled. This option specifies the status after the student completes all the requirements of the program. This dropdown lists many options, however only concern yourself with three.
o Graduate or Completed: Designates that they have completed all requirements of the program. The function of these two statuses are the same in the system; the difference is how the status displays on the student’s transcripts.
o Enrolled: Use this option if there are no completion requirements. If this is selected it means that the student can take as many courses as they wish until the program end date.
§ Completion Certificate: This is used to specify a certificate of completion after the student successfully completes all the requirements of the program. This requires a document template file for your project consultant to configure.
§ Button Graphic: This requires a document template file and specific transcript layout that your project consultant can configure. This graphic would display on the transcript page for the program.
§ Ignore student registration end date…: If checked, the system ignores the end date defined at the course level. This means the student can have access any time without an expiration date.
Enrollment Rules:
This section of the Program Management screen is in conjunction with job roles and company rules or if students are imported. (See Corporate Structure: Imports Training Guide.)
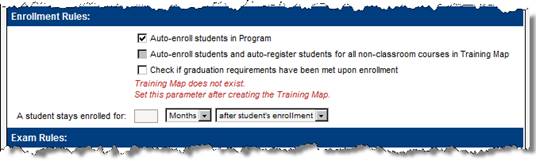
Figure 4: Enrollments Rules
§ Auto-enroll students in Program: If checked, students imported are automatically enrolled in the program if the company and job roles rules are met.
§ Auto-enroll students and auto-register…: If checked, students imported are automatically enrolled in the program and registered for all required courses in the program if the company and job roles rules are met.
§ Check if graduation requirements have been met upon enrollment: On enrollment the system will check to see if the program requirements have been met from courses taken earlier and in other programs.
§ A student stays enrolled for: This specifies how long a student has to complete the program.
Exam Rules:
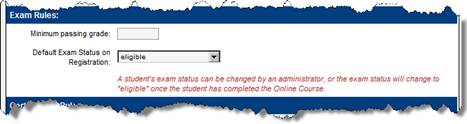
Figure 5: Exam Rules
§ Minimum Passing Grade: The numeric value entered here represents the minimum % score that is considered passing. This can also be set in the Exam window where it overrides the setting at program level. (See Exams Training Guide)
§ Default Exam Status on Registration: The two statuses to be concerned with are:
o eligible: If selected, this means that upon registration students can take the exam at any time.
o wait: If selected the student must complete the course material before being able to access the exam.
NOTE: The Default Exam Status on Registration settings affects all courses in the program. Online courses must have the SCORM setting that passes back course completion to the LMS or use the Prosperity Tracking feature to specify if a student can access the exam without completing the course materials.
Certification Rules:
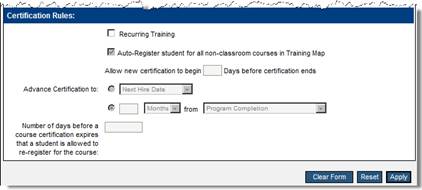
Figure 6: Certification Rules
The certification rules set at the program level indicate that after the student completes all the program requirements, they are eligible for certification.
§ Recurring Training: If checked, students are required to renew their certification at a specified frequency. If you are using recurring training then you must select the Program Completion status of enrolled.
§ Auto-Register student for all non-classroom courses in Training Map: When then next cycle happens all non-classroom courses will be registered again.
§ Allow new certification to begin: The value entered here specified the number of days the student can begin the process of recertification before their current certification expires.
§ Advance Certification to: The options here designate the period of time for which the certification is valid.
§ Number of days before a course certification expires…: This is used if Recurring Training at the Program level is not checked. This is similar to the allow new certification to begin but applies to courses that have a certification timespan set.
Additional Options
§ Custom Settings: This is used to define the minimum hours a student should spend in the combined courses under this program, in order to allow the student to print their certificate. Decimals are allowed.
§ Copy Program: Clicking Copy Program creates a new program that copies the program information page settings and the Event email setup.
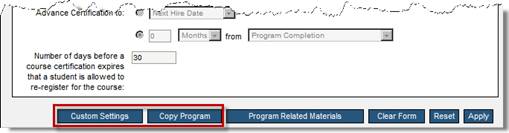
Figure 7: Additional Options
Add Related Materials
Along with the material that comprises the core content for a course, you can also choose to link Related Materials to a course which provides supplemental or corollary information. Viewing related material is not required for completion of a course; however, it may provide the student with additional information or assistance in completing the core material of a course. Related Materials can either be a link to another web site, a document on another site, or a file which you upload to the Prosperity server.
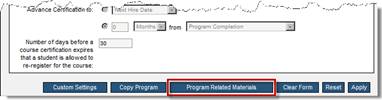
Figure 8: Related Materials
1. Click Related Materials.
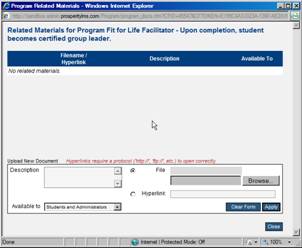
Figure 9: Related Materials
2. Click in the Description field and type a description of the materials you are adding.
3. Click the Available to dropdown and specify if the materials are accessible to the administrator only, or to both the students and administrators.
4. If you are uploading a file, click the File radio button, then click the Browse button to navigate to and select the file.
5. Click Add.
6. You can repeat step 4 and 5 for each file you are uploading.
7. If you are adding a link to a website or an intranet site, click the Hyperlink button and type in the path or URL for the site, then click Add.
8. The materials you add display at the top of the screen.
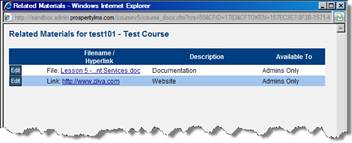
Figure 10: Related Materials Added
Training Map
By completing the Program Management form, you have defined the program shell. Next, you specify the courses that are required for the student to successfully complete, in order to satisfy the program requirements. This is performed by specifying the Training Map.
The Training Map indicates the courses and activities the student must complete, and organizes them into steps. You must have one step; however you can have multiple steps. The sequence of steps can be enforced, or the student can complete the steps in any order.
Add a Step
1. Select Training Map from the horizontal menu bar.
2. Select the Add Step button.
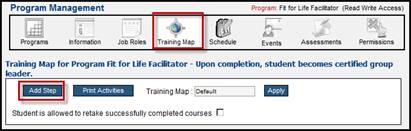
Figure 11: Add Step
3. The STEP 1 form displays.
4. Enter the Step Name.
5. Select the Save Step button.
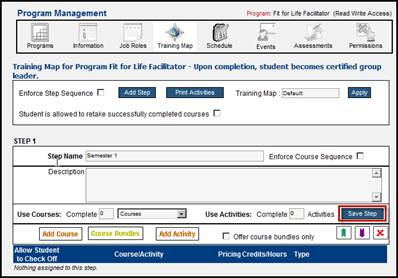
Figure 12: Save Step
Add a Course
6. Click Add Course.
7. The Add a Course window displays with existing active courses listed. You can search for a course by entering key words in the Search Courses field, or click Show Inactive to list inactive courses.
8. Click to check all the required course checkboxes, and then click Add All Selected.
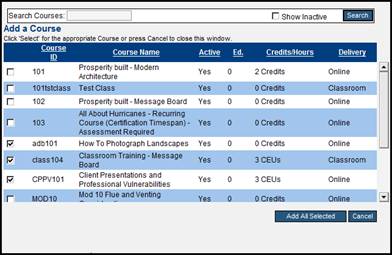
Figure 13: Add Selected Courses
9. The selected courses populate the step.
10. Using either the total number of courses or the total number of credits, enter a value in the Use Courses: Complete text field. This can be left as 0 if this program is an elective and there are not requirements.
11. Click the dropdown and select either Courses or Credits.
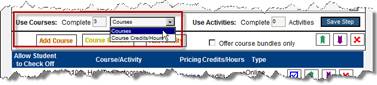
Figure 14: Specify Completion Requirements
12. If the student is to complete the courses in the order in which they display in the step, click to check Enforce Course Sequence.
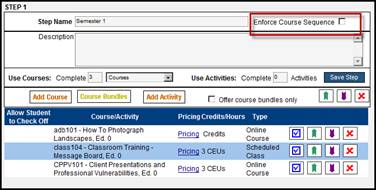
Figure 15: Enforce Course Sequence
NOTE: Courses can be re-ordered by clicking the green up or purple down arrows. If you accidentally add the wrong course, courses can be deleted from the program by clicking the red ‘X’.
13. Click Save Step.
14. Click Add Step to add another step.
Upon completing all the required courses, the student’s enrollment status changes from Open to the designation set on the Program Information screen (either graduated or complete.)
Add Activities
Some courses may require non-course activities. For example, a new hire program may require that students turn in their W2 form and new hire paperwork. Or a certification course may require that students submit their current license or certification. By specifying activities you create a checklist that either the student or an administrator can check off as the activities are completed.
1. Click Add Activity.
2. The add an Activity window displays listing existing activities. You can select from the list, or click New Activity.
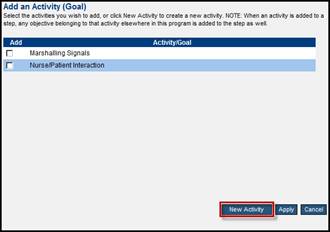
Figure 16: Add Activity
3. After clicking New Activity, enter the text that describes the activity.
o You can specify how long the activity is valid. If there is no expiration date, then leave blank.
o You can click Browse to add an attachment for example, if you want students to download a form that requires their signature and submission.
o Click Apply.
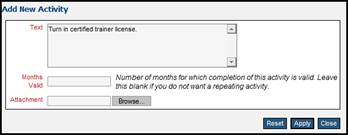
Figure 17: New Activity
4. The activity you just created or selected displays in the step.
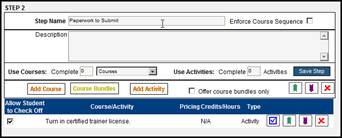
Figure 18: Added Activity
5. Next, click the blue checkbox to define the objective for the activity.
6. You can either click to select from the list of objectives, or add objectives by clicking Add Objective and then New Objective.
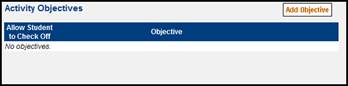
Figure 19: Add Objective
7. Click to select the objective that describes the activity you just added.
8. Click Apply.
9. Specify the number of activities that are required.
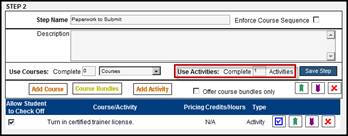
Figure 20: Number of Activities Required
10. If you want the student to be allowed to check it off when it is completed, click to check Allow Student to Check Off.
11. If you add multiple steps, you can specify that the steps are to be completed in the order they display by clicking to check Enforce Step Sequence.

Figure 21: Enforce Step Sequence
Additional Notes about the Training Map
§ If the student is allowed to retake the successfully completed courses, click to check the checkbox shown below. If not checked (default) the student cannot re-register for a course after successfully completion.
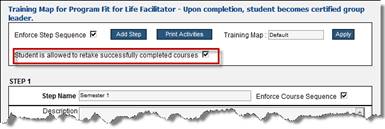
Figure 22: Student can retake course
§ Do not change the Training Map text field. Any change requires your project consultant to perform additional configuration.
§ Print activities: This is used to print off the checklist so an administrator can have a printed copy.
§ Click Apply when finished with the Training Map.
Job Roles Overview
A Job Role is the category of work that a student can be grouped into. For example, a job role may be “Supervisors”. In the system, Job Roles are used to allow and disallow student’s access to Programs. For example, someone in a Supervisor job role could be allowed to enroll in the Supervisor Training program but not the Intern Training Program.
Getting Started with Job Roles
This section shows you how to:
§ Set up Job Roles
§ Link Job Roles to the Program
Job roles can be added three ways:
§ Import students with job roles
§ When creating a program
§ From the Job Roles menu option under Curriculum
Set up Job Roles
1. Click the Program menu option, under Curriculum.
2. Click the desired program.
3. Select Job Roles from the horizontal menu bar in a specific Program Management screen.
4. Click Add Job Role.
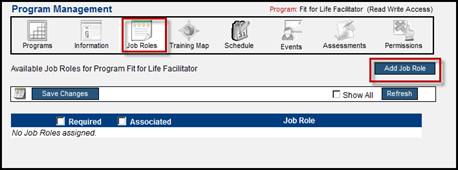
Figure 23: Job Roles
5. OR, click Job Roles under Curriculum.
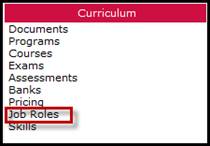
Figure 24: Job Roles Menu Option
6. Click Add New.
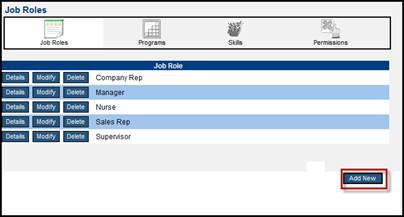
Figure 25: Add New Job Role
7. In the Job Role Admin window, enter the name of the job role in the text field, and then click Apply.
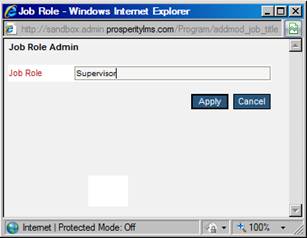
Figure 26: Add Job Role
Link Job Roles to Programs
When students enroll in a program, they specify their job role. The system uses the job role specification to determine if the student is allowed to enroll in the program.
1. From the Job Roles screen in Program Management, click to check Show All, then click Refresh.
2. Specify job roles that are required to take this training by clicking the checkbox in the Required column for each appropriate job role. If the Required checkbox is checked the Associated will also have to be checked.
3. Designate courses that are elective for students within a specific job role by clicking to check Associated.
NOTE: Both Required and Associated can be checked for one job role..
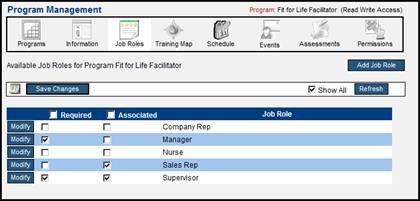
Figure 27: Link Job Roles
To change the name of a job role, click Modify next to the job role and type the new name, then click Apply.
Schedules
The Schedules feature allows you to specify a schedule for a program. This feature is accessed by clicking the Schedule button from the Program menu options.
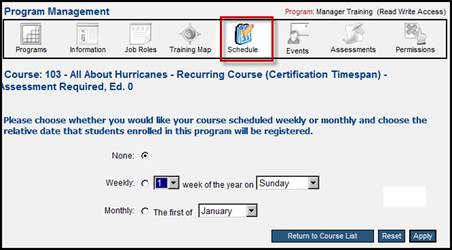
A program can be scheduled:
§ Weekly, where you can specify which week of the year, and the day the week starts.
§ Monthly, where you can specify the first month the program starts.
§ Or, you can indicate no schedule by clicking None.
Events (Email) Overview
Events refer to sending automated email notifications from within Prosperity. Events are accessed by selecting the Program menu option under Curriculum, choosing the program and clicking Event from the horizontal menu.

Figure 28: Events
There are two different categories of actions that trigger an email:
§ Event – the normal event is triggered by a user (admin or student) action. Example: A student registers for a course.
§ Reminder – the reminder is triggered by a schedule. Example: A course will reach its deadline in 2 days (Course Due in 2 Days).
Any event or reminder can be configured to be sent to multiple people:
§ The student
§ Any category of company rep (supervisor, finance, etc…)
§ Other (any hard coded email address of your choosing)
§ Instructor
Getting Started with Email Events
This guide shows you how to:
1. Designate events to trigger email.
2. Designate reminders to trigger email.
3. Specify the recipient of both categories of emails.
Designate Event Notifications
1. Click Events from the horizontal menu bar in the specific Program Management screen.

Figure 29: Program Email Events
2. Specify the event that should trigger an email by clicking Details next to the appropriate event.
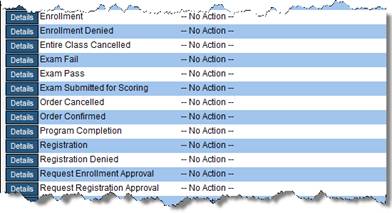
Figure 30: Select Email Events
3. From the event Details screen, specify the recipients of the email by clicking to check the checkbox next to each recipient option. Notice that there is an ‘other’ option that when selected requires you to enter the specific email address.
4. For each email recipient, click Pick Email to display a pick list containing all emails created in the system.
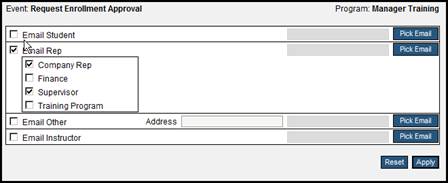
Figure 32: Pick Recipients
5. Scroll to find the appropriate email, and click Select. (See the Training Resources: Emails Training Guide for information on creating custom emails.)
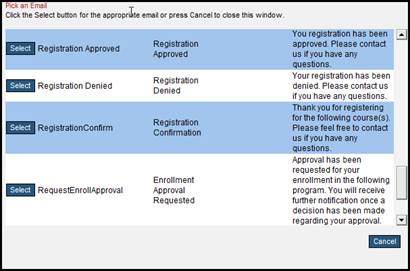
Figure 33: Pick Email
6. The specified email populates the email field for each recipient.
7. Click Apply.
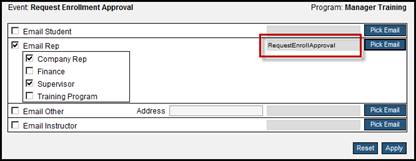
Figure 34: Email and Recipients Specified
8. For each specified event, the action to occur displays.
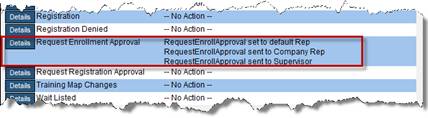
Figure 35: Defined Email Events
9. Repeat steps 2 – 7 for each event you want to trigger an email.
10. Repeat steps 2 – 7 to specify reminders, using the Reminder grid.
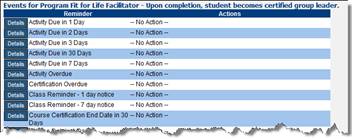
Figure 36: Reminders
The number of days specified in each reminder option is configurable; consult your project consultant.
Approval Workflow
Approval workflow is generally set up once, and then ‘used’ during curriculum set up when a student needs permission (approval) to take a course or class. When you set up an approval workflow you are basically sending a linked chain of emails through the chain of command. Each link in the chain (a supervisor, HR admin, etc…) has to grant approval or deny the request. If any one denies it, the process stops and the registration request is denied. As each link in the chain approves their portion, the next link in the chain receives the email with the approval request. Once everyone has approved, the student is officially registered and gets an email.
Therefore, the administrator’s job during ‘set up’ is to define the approval workflow they want. For example:
§ Workflow 1: only the supervisor needs to approve
§ Workflow 2: first the supervisor approves, then the HR manager approves, then the district manager approves
Once the approval workflow is set up, it gets assigned in the ‘events’ section for each program under the ‘request registration approval’ event.
General Steps
There are three steps to setting up the approval workflow:
1. Specify the email recipient(s) while identifying email events for enrollment and registration approval requests during program setup.
2. Define curriculum rules while setting up a company and specify the programs that require enrollment and registration approval. (See the Corporate Structure: Companies Training Guide.)
3. Define the Workflow Approval step.
Workflow Approval Steps
1. Click Approval Process from the Admin menu.
2. Click Add New Workflow to define a new approval workflow, or click an existing workflow title to modify it.
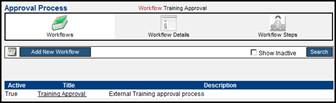
Figure 37: Approval Process
3. Enter the Workflow Title and Description.
4. Click to check the Active checkbox.
5. Click Apply.
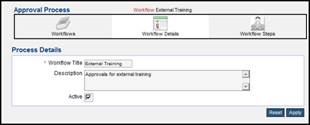
Figure 38: Workflow Title
6. Click Add Step.
7. Enter the Step Title.
8. Click to check who approval requests should be emailed to.
9. Click Pick Email.
10. Choose the email from the Emails screen.
11. Click to select the On Approve action from the dropdown.
12. Click to select the On Deny action from the dropdown.
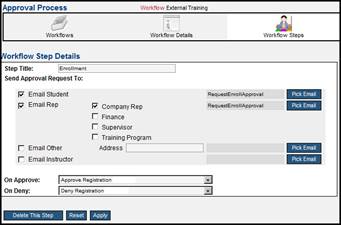
Figure 39: Approval Step
13. Click Apply.
14. To add additional steps, repeat steps 6-13.
15. To change the order of steps, click the Up or Down buttons.
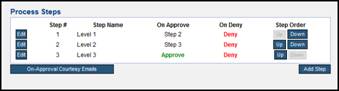
Figure 40: Change Order of Approval Steps
Assessments
See the Training Resources: Assessments Guide for information on how to link an assessment to a program or course, as well as how to make an assessment required.
Permissions
This section of Program setup is only used when the left hand menu link titled ‘Programs’ is given to lower level administrative groups for limited access. By default, the system will only allow users within the Enterprise Admin Group (users with full administrative permissions) access to the selected Program. However, you can specify that a selected Program can be available to defined Admin Groups with Read Write or Read Only access. This setting allows lower level administrators access only defined Programs in the catalog.
To View and Set a Specific Course’s Permissions
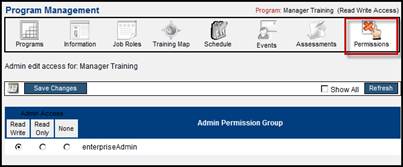
Figure 41: Program Permissions
1. Locate the Program and click Permissions.
2. Click Show All and then click the Refresh button.
3. Select the radio button to the left of the Administrative Group name you wish to allow access.
4. Note the column headings:
o Read Write: allows users to make modifications to the course and exam.
o Read Only: allows users to only see the course and exam in the catalog but not make modifications.
o None: the selected group has no access, and this course will not appear when the user searches through the catalog.
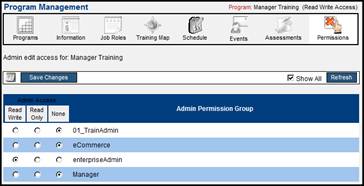
Figure 42: Show All
5. Click the Save Changes button to save modifications.
 Training Guide Corporate Structure:
Companies
Training Guide Corporate Structure:
Companies