Training Guide Setting Up Instructor Led Training (Class Sessions)
Instructor Led Training Overview
The Instructor Led training will help you to understand how the Instructor is set up in the Prosperity tool and how the Class, Classroom, Instructor, and Program are all tied together. We will discuss in depth about how you can use the tools of Prosperity to assist you in the delivery and management of your course.
Utilizing the tools provided in Prosperity will make classroom delivery seamless as well as providing excellent communication opportunities with automated emails and a message board.
Work Flow for Setting Up and Managing ILT
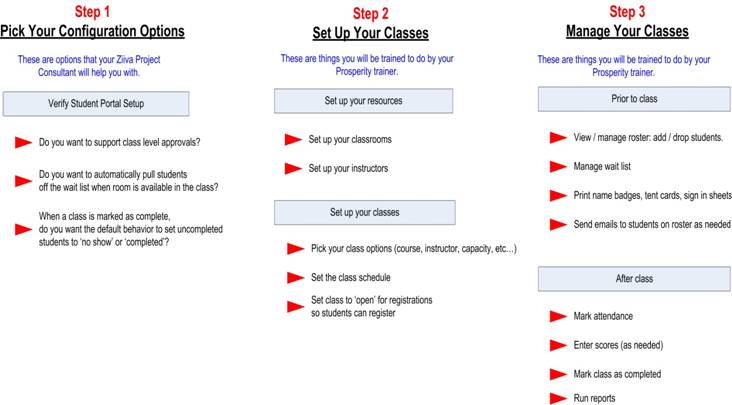
This Work Flow chart above helps you define how you can set Prosperity up to reach a very successful implementation in 3 easy steps.
Picking your configuration options (step 1) is covered in detail, in the Prosperity Configuration: Admin Portal training guide. In general this step includes working with your project consultant to answer these questions:
o Do you want to support Class level approvals?
o Do you want to automatically pull Students off the Wait List when room is available in the class?
o When a Class is marked as complete, do you want the default behavior to set uncompleted Student to “no show or “completed”?
Step 2, Setting Up Classrooms is covered in detail, in the Prosperity Training Resources: Classrooms. Classroom setup involves defining a classroom and all of its attributes in Prosperity, and adding it to what could be considered as a bank of classrooms.
Setting up instructors is covered in detail in the Prosperity Training Resources: Instructors training guide and involves creating or adding an instructor to what could be considered a bank of instructors. Once you have created your bank of classrooms and instructors, you can associate them to a class.
Components of Instructor Led Training
In Prosperity, Instructor Led Training is centered on the
“Class.” A class is a scheduled Course at a given location, time and date. 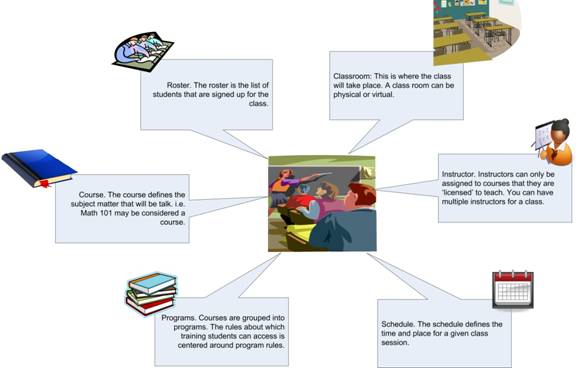
NOTE: To schedule a class, it is assumed that you have already set up any associated instructors, courses, and classrooms.
Classes are created from the Admin menu options, in the Admin Portal, and involve these steps:
o Create a class: Indicate class options such as course, instructor, capacity, etc.
o Add a class to the schedule
o Verify instructor availability and check for schedule conflict
o Add students to class roster
o Manage roster and wait list
o Print name badges, tent cards, sign in sheets
o Mark attendance
Create a Class
1. Select Classes from the sidebar menu.
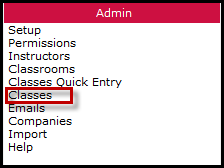
Figure 1: Classes Menu Option
2. Select New Class from the bottom right hand side of the window.
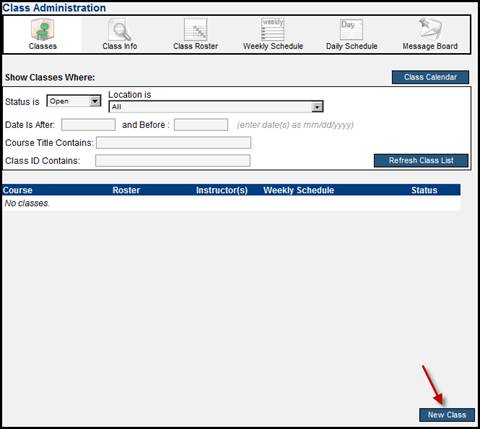
Figure 2: New Class
3. The Class Administration screen displays.

4. From this screen you can fill in all applicable fields. Fields in gray, such as the Course Name, are automatically filled by the system. Required fields are in “red”, and they are as follows:
o Course: Use the Pick button to search for and select a course to populate this field.
o Which Students have Permissions to take this class – You can select from the drop down what groups of students are allowed access to this class.
o Class Capacity – This field identifies the maximum number of students this class can hold – Minimum can be defined here also. The student wait list is based on what is specified in the class Capacity field. Once the class capacity has been met by student registrations, the system will automatically place the student registrations in the wait status. Example: If there were 15 students signed up and the capacity is 10, then the remaining 5 students will then be placed on the waiting list for the next available class.
o Status – This is determined to identify how the course shall be presented for example:
o Pending – the class has been created but is not ready to allow students to enroll
o Open – the class has is now available for students to register
o Current – the class has begun and all enrollments are stopped
o Completed – class is finished and you must mark all the Students that successfully completed the class as “completed”. Click on Apply to save all data entered.
NOTE: During class setup, specify the status to Pending, so that it does not display in the catalog until the class is completely set up. You can change the status to “open” after setup is complete. A class must have an “OPEN” status to allow student registrations.
Additional Fields may be filled in to provide information for example if you are holding a physical class for example a hotel, the Accommodations field is available to add instructions for example if a class is in a hotel, this field allows you to add directions, discounts, restaurants etc.
o Primary Location – use the Pick button to select the physical location of the class. This can be a classroom, or a URL in the event the class is online, but refers to the general location such as campus, building, or address. The actual classroom is selected during the scheduling process. This location is used for display purposes on the student catalog.
o Total Cost, Suggested Cost, Max Cost, will be addressed only if this is an eCommerce site where the course is paid for. You will determine the cost of the course here.
o Cancel this Class - If you click this button, the class will become in-activated and if you have automated email events set up and turned on in your Program, an email will go out to attendees to notify them that the class has been canceled.
o “Do not generate automatic email events for class information changes, class cancelations, or class completions”. – is checked only if you have email events set up and turned on in the program in which this Course is attached. This option will override the Program setting.
After clicking Apply, you can click the View button to assign an instructor to the class.
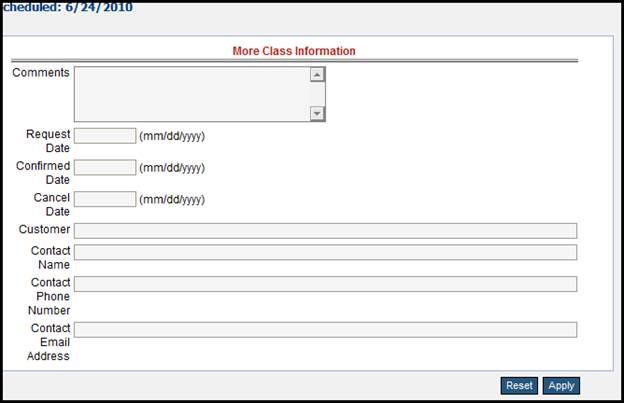
5. More Class Information: Customized class information can edited by clicking the More Class Information button. If you would like to use custom data for your classes, your project consultant will work with you to set up the desired data fields. Tell your project consultant or Submit your request for custom data fields to our support email (support@ziiva.com) and it will be redirected to the Professional Services department for review.
Schedule the Class
Next, you schedule the class. To add a class to the Schedule, you can either click Weekly Schedule or Daily Schedule from the horizontal bar at the top of the screen. If your class is going to span multiple weeks (such as every Monday for 3 weeks) or if you have a week long class (e.g. M-F 8:00 to 12:00) then the Weekly Schedule may be more convenient for you. Otherwise choose the Daily Schedule.

Weekly Schedule
Specifying Weekly Schedule displays this screen:
Use this when class schedules are the same week by week for quick scheduling. This screen contains a template consisting of all the weeks in the class date range. Saving entries for each day populates the weekly schedule.
1. Select a day from the grid and click Pick to select a classroom to automatically populate the Classroom, Location and Capacity fields
2. Enter Start Time and End time
3. Click Check Conflicts and then click Apply.
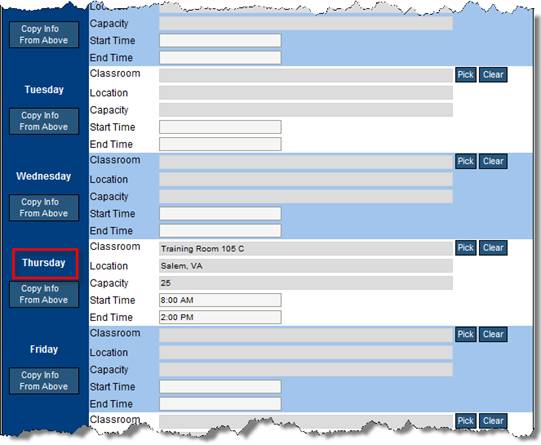
Daily Schedule
The Daily Schedule allows you to set up or modify each individual class session. Individual sessions that are automatically scheduled during weekly scheduling can be modified with the Daily Schedule screen. This screen shows every scheduled session of the class. In the example below, the class meets every Thursday, from 8am to 2pm.
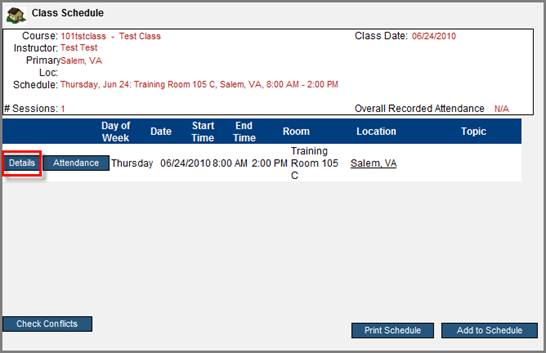
To view or modify details of a scheduled class day, click Details.
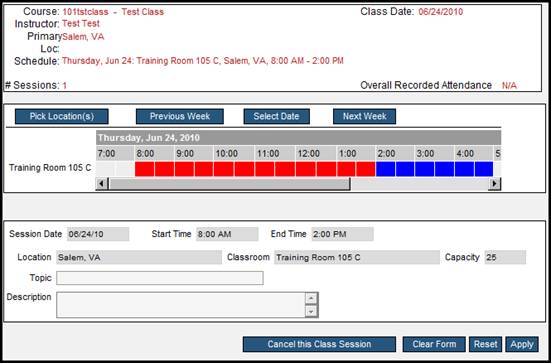
1. Select Pick Location to change the location. The location selected will populate the location information in the location field.
2. To see dates in the grid for the previous week select Previous Week.
3. Click Select Date to display a calendar widget from which you can advance through weeks, months, and years and click on a specific date.
4. To see dates in the grid for the next week select Next Week.
5. Clicking directly into a grid cell for a specific time will specify the time. In the example shown above, the class meets from 8:30 to 2:00. To change the time, for example, to starting at 9:00, simply click on the red cell for 8:30 to remove it.
NOTE: Notice that you can enter a topic for the specified day.
6. Click Cancel this Class Session to cancel the specified session.
7. Click Apply to save input.
8. Once you have successfully scheduled the class, go back to the Class Info page and specify the status to Open, which allows students to register.
Updating Outlook Calendar
The next segment to this screen deals with “updating your Outlook calendar” to include this class. Before any of these settings can work, you must go into your Browser and adjust some settings:
o Go to - Tools > Internet Options
o Select Security > Custom Level
o From here you must select the PROMPT radial button for “Initialize and script Active X controls not marked as safe scripting”.
o Click OK and then Apply to save your changes.
Adding the class to Outlook begins by clicking the Class Info icon on the top menu.
1. Select the appropriate time zone from the drop down that is applicable to you.
2. Select the Start and End date of the course by using the calendar widgets.
3. The schedule summary that is shown to students displays in the Schedule area, but only after a daily or weekly schedule has been created.
Daily Checklist
Prior to Class
§ View / manage Roster: Add / Drop Students
§ Manage Wait List
§ Print name badges, tent cards, sign in sheets
§ Send emails to Students on Roster as needed
After Class
§ Mark Attendance
§ Enter Exam Scores
§ Mark a Class Completed
Class Rosters
A class roster is automatically created as students register for a given class. As an administrator or instructor, you can also add students to the roster.
Additional features of class rosters are:
§ Creating/printing name badges, tent cards, certificates
§ Printing a sign-in sheet
Before you can create a class roster, you have to set up your corporate structure and add students to each company division. (See Corporate Structure: Imports Guide)
Create a Class Roster
Class rosters are accessed by clicking the Classes menu option under the Admin menu, selecting a class and then choosing the Class Roster option from the horizontal menu bar.

Figure 3: Class Rosters
4. Select Class Roster from the horizontal menu.
5. Select Add to Roster
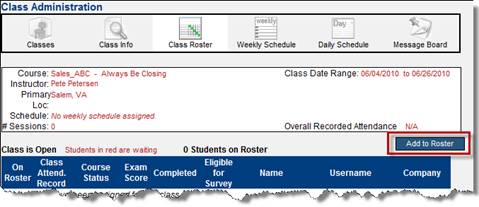
Figure 4: Add to Roster
6. Use any combination of dropdowns provided in the search section of the screen to locate the names to add to the roster, and then click Search.
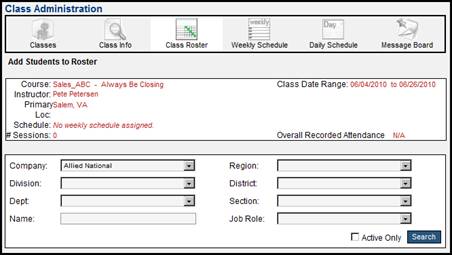
Figure 5: Search for Names
7. Click the checkboxes to the left of the names you want to add to the Roster. OR, click the Add checkbox to automatically select all names.
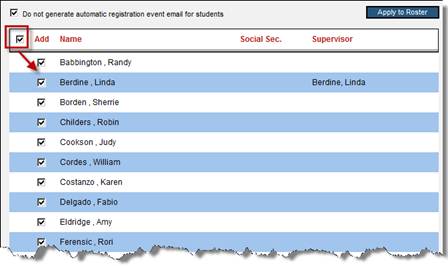
Figure 6: Select Names to Add
8. Click Apply to Roster.
NOTE: An administrator or instructor will be able to add students to the roster, even if the student’s permissions do not allow them to register for that class. A student added to the roster this way will not be wait listed, even if the class is at capacity.
Manage Wait List
When the number of student class registrations surpass the class capacity, the class status is marked as FULL, and the last students registrations are marked as Wait.

Emails can be sent to wait listed students, by clicking the Send Email to Wait Listed Students button. To allow the wait listed students to attend the course, follow these steps:
1. Click Wait.
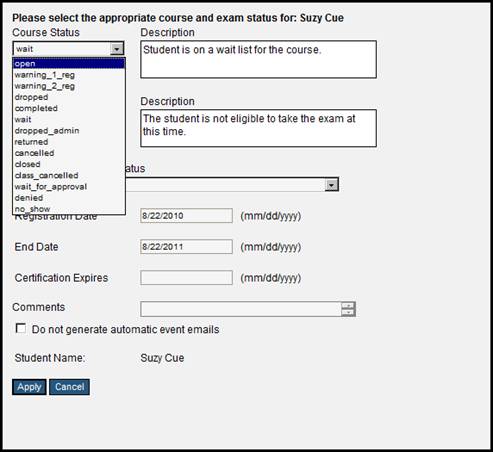
2. Click the Course Status dropdown and select Open.
3. Click Apply to change the student status to Open, meaning they can take the class.
4. Clicking Send Emails to Open/Complete students notifies wait listed students that they can attend the class.
Printing and Email Options
You have several options after you create the class roster:
§ Printing options
§ Email options
5. Click Class Printing Options to print name badges, tent cards, sign-in sheets, or certificates. There is also an option to export the class roster to a.csv file.
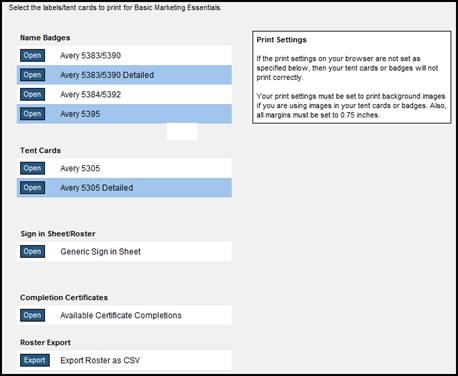
Figure 7: Class Roster Print Options
6. For each item to print, click Open to display a print preview, and then click Print.
7. To send an email to students on the class roster, click Send Email to Open/Complete Students.

Figure 8: Send Email
8. The email screen that displays is described in detail in the Training Resources: Emails Training Guide.
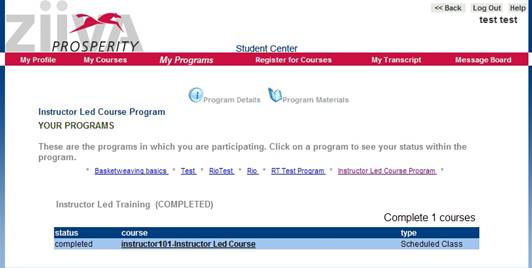
From the Student Portal, the Student who has completed the class will see the following:
![]()
Mark Attendance
There are two ways to mark the attendance for classes:
§ From the Daily Schedule
§ From the Class Info screen
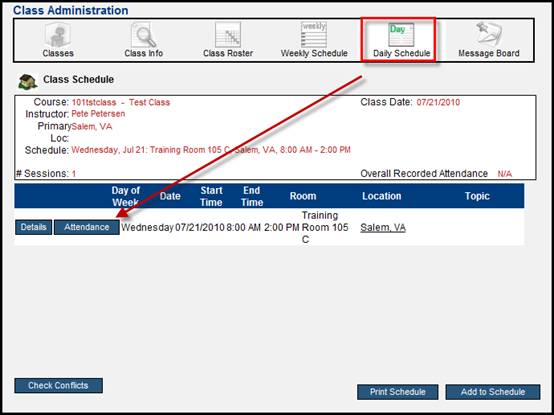
Mark Attendance from Daily Schedule
9. Select Classes from the Admin menu.
10. Search for and select the appropriate class.
11. Click Daily Schedule from the top menu.
12. Click on the Attendance icon.
13. Click to check each checkbox for students who attended the class.
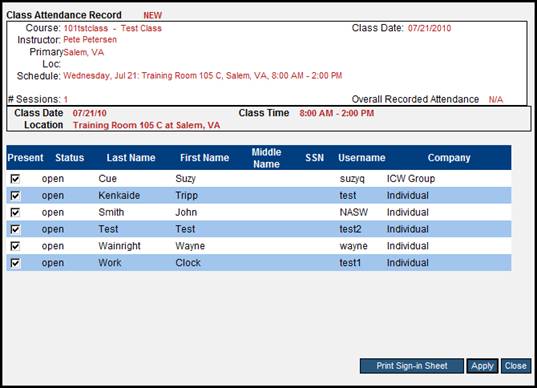
14. Click Apply and then Close.
Mark Attendance from Class Info Screen
15. Select Classes from the Admin menu.
16. Search for and select the appropriate class.
17. Click Completed for the class Status.
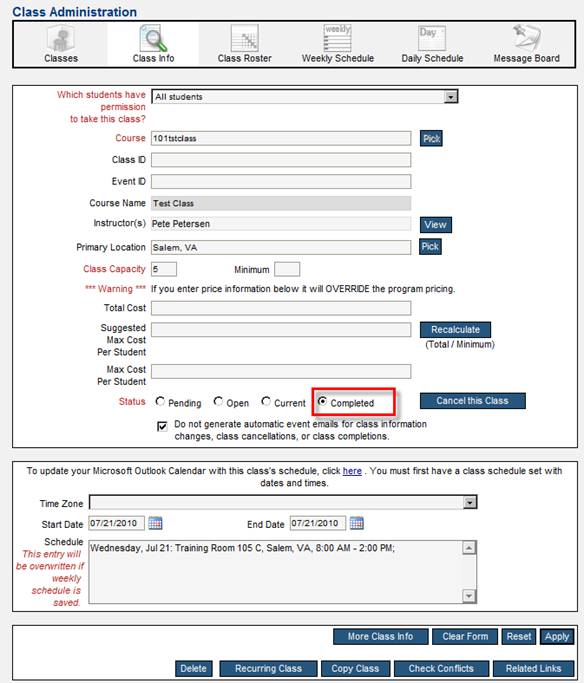
18. This action will prompt you with the following message. “Everyone who has completed the course will be automatically marked as present for each day in this class.
19. Click OK if this is what you want, or press Cancel to leave the attendance as is.
20. Click Apply to save all changes.
Additional Options
The Message Board allows students and administrators to communicate to all other LMS users by posting messages. Administrators have permissions which enable them to delete any message that they deem inappropriate.
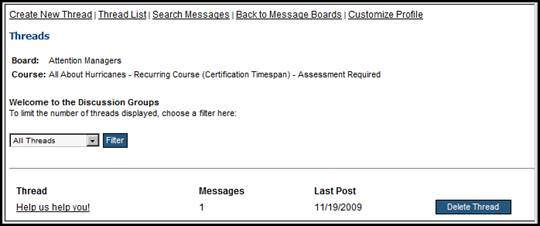
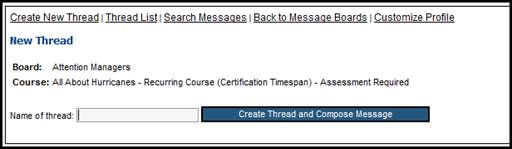
A thread is a collection of messages that have been posted as "replies" to each other. You can begin a new thread by:
o Click Create New Thread selection.
o Type in a subject name and click Create Thread and Compose Message.
o Write your message.
Other students or administrators can then post replies to it. To reply to another person's thread, click the thread name and go to the bottom of the screen. Type in your reply and click the Post Message button.
In Customize Profile, your display order for threads and your signature may be set. The display order is the order in which messages in a thread are ordered for you. Oldest First will order the messages such that the oldest message in the thread will be displayed first, the second oldest will display second, and so on.
Likewise, Newest First will order the messages such that the newest message in the thread will be displayed first, the second newest will display second, and so on. Your signature is a string of text that can be automatically added to the end of every message that you post to the message board.
To search messages, click Search Messages and type a string that appears in the subject or message of the messageyou are looking for, and then click Search. The messages that have the string you typed in will then be displayed.
 Instructor Led Training
Overview
Instructor Led Training
Overview