Training Guide Corporate Structure: Imports
Imports Overview
The Imports feature in the Admin Portal allows the user to import data. Importing means you are taking a large amount of information from outside the Prosperity system and putting it into the Prosperity system. Instead of adding students to Prosperity one a ta time, you can import student data that is not already in the system.
Data imports must be contained in a single comma-separated text file (.csv or .txt file) and set up according to a very specific format or the import will run incorrectly. These directions are available on the Import screen by clicking the Format button for the import you wish to do.
Getting Started with Imports
This guide shows you how to:
§ Import Companies
§ Import Students
§ Import Company Reps
§ Import Rep Roles
Import Companies
1. Click the Import option under the Admin menu.
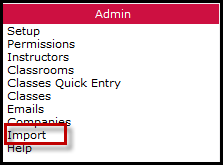
Figure 1: Import Menu Option
2. The Import screen displays.
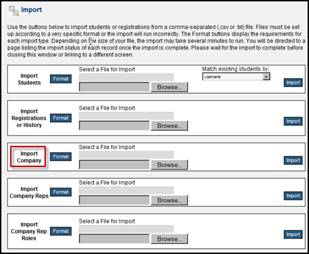
Figure 2: Import Screen
3. Click the Format button for instructions on how to set up the Company Import file.
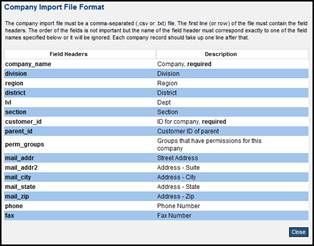
Figure 3: Company Import File Format Instructions
The left column lists field headers in the way in which they are to appear in the file. You do not have to use all of the field headers, but the required field headers are indicated with the word ‘required’ in the description. For example, the company name and ID are required fields. You can also have the file contain the mailing address and phone. The field headers are going to be placed as column headers, such as in an Excel spreadsheet or a Word table. Using our example, the field headers for this company import file using MS Word will look like this:
|
company_name |
customer_id |
mail_addr |
mail_city |
mail_state |
mail_zip |
|
|
|
|
|
|
|
|
|
|
|
|
|
|
The field headers using Excel will look like this:
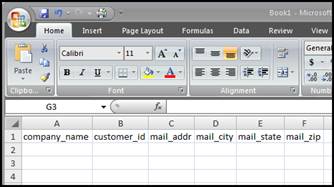
Figure 4: Field Headers in Excel
Then, for each field header (column) you enter the actual data. In MS Word, it looks like this:
|
company_name |
customer_id |
mail_addr |
mail_city |
mail_state |
mail_zip |
|
National Sports |
NS100 |
123 Main St. |
Phoenix |
AZ |
85021 |
|
|
|
|
|
|
|
In MS Excel, it looks like this:
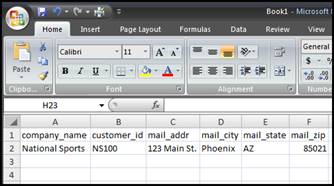
Figure 5: Company Import Data in Excel
Save the Company Import File
In Word, click Save As, and specify to save as .txt:
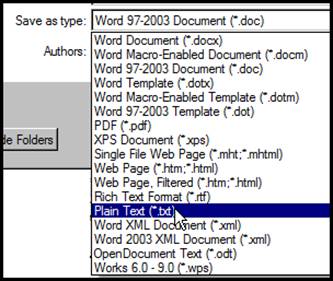
Figure 6: Word – Save As .txt
If created using Excel, save as a .csv file.
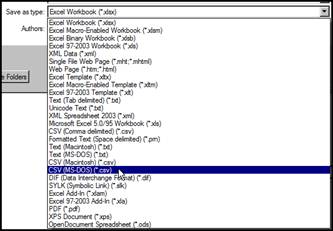
Figure 7: Excel - Save As .csv
When either file format is opened in Notepad, the file looks like this:

Upload the Company Import File
1. From the Import Company section of the Import screen, click Browse.
2. Navigate to the file you just created and double-click it.
3. Click the Import button.
4. When the import is completed, click Company Status from the Reports menu to see the new company added to the list of companies.
5. 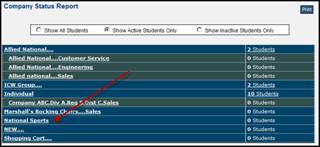
Figure 8: Company Added
Import Students
Information requested by the Student Profile form completed when enrolling new students can be populated by creating the Student Import file. This method is a good way to enroll multiple students at the same time.
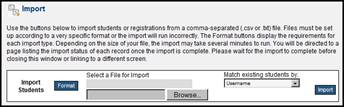
Figure 9: Student Import
Like all import files, the Student Import file must follow a specific format. Instructions for formatting this file are accessed by clicking Format for Import Students. General instructions are as follows:
§ The student import file must be a comma-separated (.csv or .txt) file.
§ The first line (or row) of the file must contain the field headers.
§ The order of the fields is not important but the name of the field header must correspond exactly to one of the field names specified below.
§ Each student should take up one line
In addition to field headers, the formatting instructions provide information on the type of data (string or character) as well as the length allowed for each field.
Required Fields
The formatting instructions provide a table of required fields.
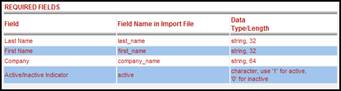
Figure 10: Student Import Required Fields
Interpret these requirements as follows:
§ Last Name: The field header is labelled as last_name, and can be a string of up to 32 characters.
§ First Name: The field header is labelled first_name, and can be a string of up to 32 characters.
§ Company: The field header is labelled as company_name, and can be a string of up to 64 characters.
NOTE: The LMS will use the Company levels you specify in the import file for each student to assign students to a Company. If no existing Company match is found for a student, he will be assigned to Company "Individual", and you will need to manually set his Company association later. Company levels are Company, Division, Region, District, Dept, and Section.
§ Active/Inactive Indicator: The field header is labelled as active. Place ‘1’ for active, or ‘0’ for inactive.
Required Fields for Matching
As long as matching fields are included in the Student Import file, Prosperity can identify a scenario in which the student is already enrolled in the system, in order to prevent duplicate student enrollment records.
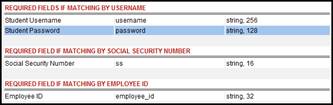
Figure 11: Matching Fields
Part of the upload process is to specify how Prosperity should handle duplicate records. This is done by including “Required Fields if Matching By…” in the import file. By including one of the matching options (username, social security number, employee ID) in the file, the system will be update the existing record with the information in the import file if it finds an identical match for the field you specify in the "Match Existing Students By" dropdown.
Finally, there are many optional fields that can be included in the Student Import file, as noted below:

Figure 12: Optional Fields
It is recommended that you include the Job Role field in the import file. Job roles are used by Prosperity to determine students who can be registered for courses.
Import Company Reps
When adding companies, one of the options is to specify a company rep. Company reps can be created automatically by creating the Company Rep import file. Follow these guidelines:
§ The import file must be a comma-separated (.csv or .txt) file.
§ The first line (or row) of the file must contain the field headers. Example: employee_id, customer_id, admin_username, admin_password
§ The order of the fields is not important but the name of the field header must correspond exactly to one of the field names specified below.
§ Each company rep record should take up one line.
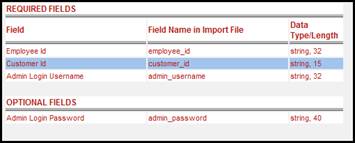
Figure 13: Company Rep Fields
Import Registrations
When you have multiple students to enroll and register, use the Import Registrations feature. This file automatically enrolls students into a specified program and registers them into a specified course.
§ The registrations import file must be a comma-separated (.csv or .txt) file.
§ There should be one line of field headers that reads username, program_id, type, id, status, status_effective_date, registration_type, objective_id, test_date, grade, passfail, cert_expires, course_name, class_id, notes, cost and then each registration/activity record should take up one line after that.
The required order of the data items is listed below. For programs under which the student does not have an enrollment, the student will be automatically enrolled if his company and job title allows participation in that program. Students will not be registered for courses that are of classroom type, or that the student has currently open.
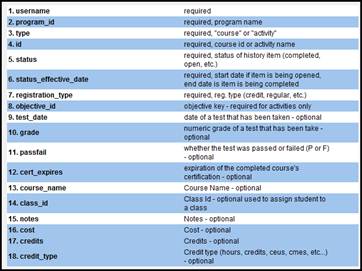
Figure 14: Registration File
 Imports
Overview
Imports
Overview